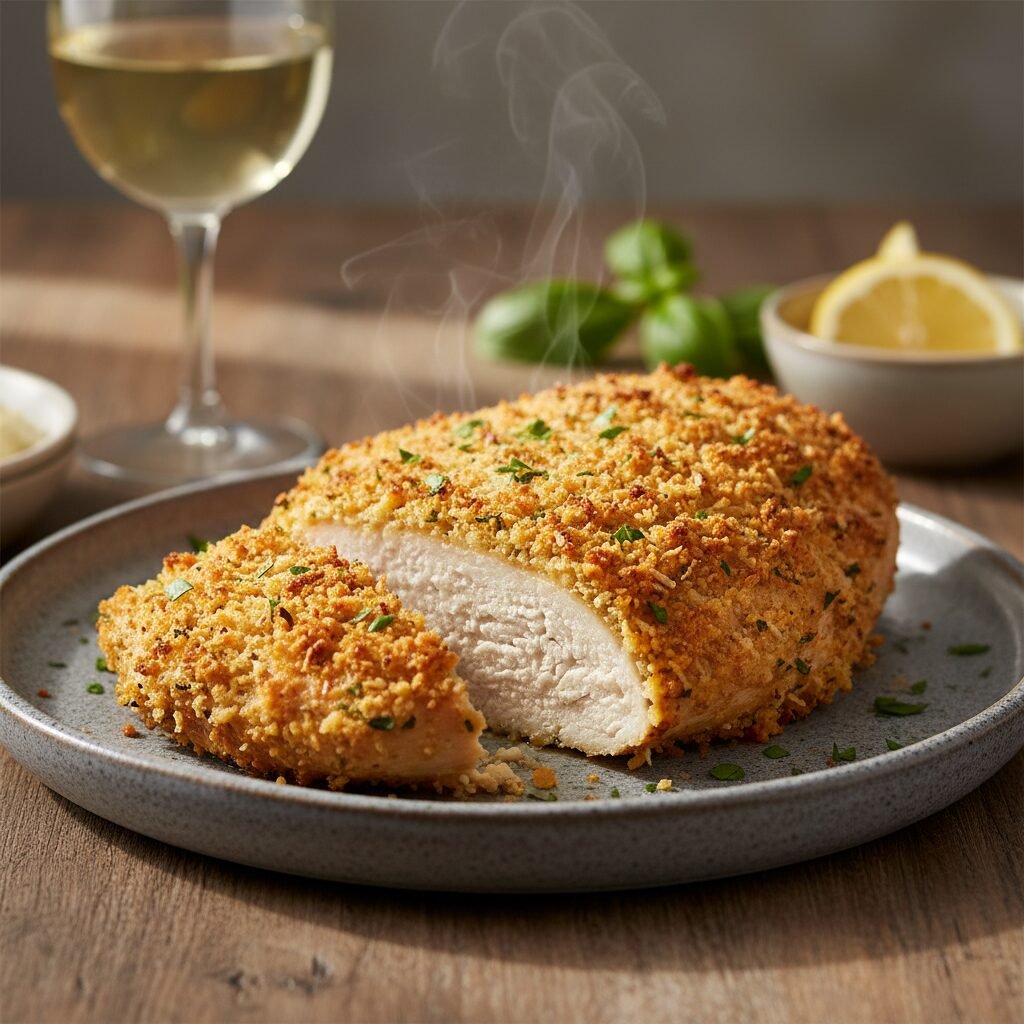
Baked Garlic Parmesan Chicken Breast: The Ultimate Light & Crispy Dinner Recipe
Baked Garlic Parmesan Chicken Breast Light Recipe
Experience the perfect blend of savory garlic and nutty parmesan in this guilt-free Baked Garlic Parmesan Chicken. Juicy on the inside and irresistibly crispy on the outside, this light recipe transforms a weeknight staple into a gourmet delight without the extra calories.
15 minutes
25 minutes
40 minutes
4 servings
Main Course
Baking
Italian-American
N/A
There is something undeniably comforting about the pairing of garlic and parmesan cheese. It is a flavor combination that transcends culinary borders, evoking memories of rustic Italian kitchens and hearty family dinners. However, traditional recipes often rely on heavy breading and deep-frying, turning a lean protein into a calorie-dense meal. This Baked Garlic Parmesan Chicken Breast Light Recipe is the answer to that dilemma, offering all the crunch and savory depth you crave without the guilt. By utilizing a smart baking technique and a carefully balanced breading mixture, we achieve a golden-brown crust that rivals any fried alternative. This dish is designed for the modern home cook who refuses to compromise on flavor for the sake of health.
The magic lies in the preparation. We swap out the heavy egg wash and flour dredge for a lighter coating method that locks in moisture while allowing the parmesan and herbs to shine. As the chicken bakes, the garlic infuses the meat with aromatic warmth, while the cheese creates a savory, crisp exterior that snaps with every bite. This recipe is not just about cutting calories; it is about elevating the natural flavors of high-quality ingredients. Whether you are meal-prepping for a busy week or hosting a casual dinner party, this dish promises to be a crowd-pleaser. It pairs beautifully with a crisp green salad, roasted vegetables, or a light pasta, making it a versatile centerpiece for any table. Get ready to fall in love with chicken breast all over again.
History & Origins
The lineage of this dish can be traced back to the rich tapestry of Italian-American cuisine, specifically the evolution of Chicken Parmesan (or Chicken Parmigiana). Originating in the early 20th century among Italian immigrants in the United States, Chicken Parmesan was an adaptation of the traditional Italian ‘Melanzane alla Parmigiana’ (Eggplant Parmesan). In Italy, meat was expensive and used sparingly, but in America, chicken was abundant and affordable. Immigrants breaded and fried the chicken cutlets, smothering them in marinara and mozzarella to create the iconic comfort food we know today.
However, the specific ‘Garlic Parmesan’ variation represents a more modern divergence, stripping away the heavy tomato sauce to focus intensely on the interplay between the sharp, salty cheese and the pungent allium. This shift mirrors the broader culinary trends of the late 20th and early 21st centuries, where home cooks began seeking ‘lighter’ alternatives to heavy, sauce-laden classics. The move from frying to baking gained significant momentum during the health-conscious waves of the 1980s and 90s. Cooks experimented with oven-frying techniques to mimic the texture of deep-frying without the vat of oil. The introduction of Panko breadcrumbs (Japanese-style breadcrumbs) into Western kitchens further revolutionized this dish, allowing for a lighter, airier crunch compared to dense traditional breadcrumbs. Today, Baked Garlic Parmesan Chicken stands as a testament to this culinary evolution—respecting the flavor profiles of the past while adapting to the dietary needs and cooking technologies of the present.
Why This Recipe Works
This recipe succeeds where many dry, flavorless baked chicken recipes fail because of a few key scientific principles regarding moisture retention and texture contrast. First, the use of a binding agent that contains a small amount of fat—often olive oil or a light mayonnaise-based coating rather than just egg whites—creates a barrier. This barrier serves two purposes: it adheres the breading to the meat more effectively, preventing it from sliding off, and it bastes the chicken in its own juices as it cooks.
Secondly, the ratio of parmesan to breadcrumbs is critical. Parmesan cheese contains natural oils and proteins that melt and brown (the Maillard reaction) at high temperatures. By mixing it with Panko breadcrumbs, which have a larger surface area and flaky texture, we create a lattice-like crust. This allows hot air to circulate around the breading, crisping it up rather than steaming it, which often happens with finer breadcrumbs.
Finally, the cooking temperature is set high (400°F/200°C). A lower temperature would dry out the lean breast meat before the coating has a chance to brown. The high heat ensures the exterior crisps quickly while the interior reaches safe cooking temperature just as the juices are at their peak. Letting the chicken rest after baking is the final, crucial step, allowing the muscle fibers to relax and reabsorb the juices, ensuring every bite is tender.
Why You’ll Love This Recipe
- ✓High-protein and low-carb friendly
- ✓Ready in under 45 minutes
- ✓Uses pantry staple ingredients
- ✓No deep-frying required
- ✓Kid-friendly and picky-eater approved
- ✓Perfect for meal prep
Equipment You’ll Need
- ✓Large baking sheet
- ✓Parchment paper or silicone baking mat
- ✓Meat mallet or rolling pin
- ✓Three shallow bowls for dredging
- ✓Whisk
- ✓Meat thermometer
- ✓Wire cooling rack (optional but recommended)
Ingredients
- ✓4 boneless, skinless chicken breasts (approx. 6 oz each)
- ✓1/2 cup Panko breadcrumbs (whole wheat for healthier option)
- ✓1/2 cup grated Parmesan cheese (freshly grated is best)
- ✓1 tbsp garlic powder
- ✓1 tsp onion powder
- ✓1 tsp dried parsley (or 1 tbsp fresh)
- ✓1/2 tsp dried basil
- ✓1/2 tsp salt
- ✓1/4 tsp black pepper
- ✓2 tbsp olive oil or melted light butter
- ✓1 tbsp minced fresh garlic
- ✓Lemon wedges (for serving)
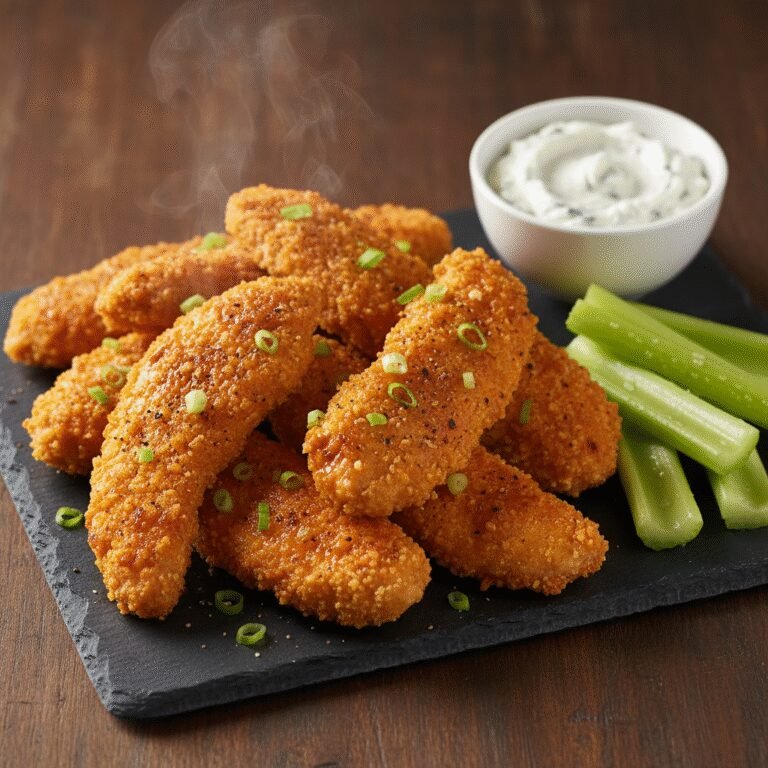
Instructions
- Preheat your oven to 400°F (200°C). Line a large baking sheet with parchment paper. For extra crispiness, place a wire rack on top of the baking sheet and spray lightly with non-stick spray.
- Prepare the chicken: Place the chicken breasts between two sheets of plastic wrap. Using a meat mallet or rolling pin, pound the chicken to an even thickness of about 1/2 to 3/4 inch. This ensures even cooking.
- Pat the chicken breasts dry with paper towels. Removing excess moisture is key to getting the breading to stick.
- In a small bowl, mix the olive oil (or melted butter) with the fresh minced garlic. Brush this mixture generously over both sides of the chicken breasts.
- In a shallow dish, combine the Panko breadcrumbs, grated Parmesan cheese, garlic powder, onion powder, parsley, basil, salt, and pepper. Stir well to distribute the spices.
- Press each chicken breast firmly into the breadcrumb mixture, ensuring a thick, even coating adheres to both sides. Shake off any loose crumbs.
- Place the coated chicken onto the prepared baking sheet (or wire rack).
- Lightly spray the top of the chicken with a bit of olive oil spray. This helps the breadcrumbs brown beautifully.
- Bake in the preheated oven for 20-25 minutes, or until the internal temperature reaches 165°F (74°C) and the crust is golden brown.
- Remove from the oven and let the chicken rest for 5 minutes before slicing. This keeps the juices inside.
- Serve warm with a squeeze of fresh lemon juice.
Expert Cooking Tips
- ✓Pound the chicken to an even thickness to prevent drying out the thinner ends while waiting for the thick center to cook.
- ✓Use freshly grated Parmesan cheese rather than the shelf-stable shaker can variety; fresh cheese melts better and provides superior flavor.
- ✓If you want an extra golden crust, turn the broiler on for the last 1-2 minutes of cooking, but watch closely to prevent burning.
- ✓Don’t skip the resting period; cutting into the chicken immediately will cause all the flavorful juices to run out onto the plate.
- ✓For a keto-friendly version, swap the Panko breadcrumbs for crushed pork rinds or almond flour.
- ✓Ensure your oven is fully preheated before putting the chicken in; a cold oven leads to soggy breading.
Substitutions and Variations
This recipe is highly adaptable to suit various dietary needs and pantry limitations. If you are gluten-free, simply substitute the Panko breadcrumbs with a certified gluten-free breadcrumb blend or crushed gluten-free crackers. For a low-carb or Keto option, almond flour mixed with extra parmesan cheese works wonderfully, though the texture will be slightly less crunchy than Panko. If you are out of olive oil, melted butter or even a thin layer of light mayonnaise can act as the binder for the breadcrumbs. In terms of herbs, while parsley and basil are traditional, you can easily swap them for oregano, thyme, or an Italian seasoning blend. If you don’t have fresh garlic, increase the garlic powder quantity, but the fresh garlic really adds a punchy flavor that is hard to replicate. For a dairy-free version, use a vegan parmesan alternative and ensure your breadcrumbs are dairy-free.
Common Mistakes to Avoid
The most common mistake with baked breaded chicken is soggy breading, usually caused by excess moisture on the chicken or overcrowding the pan. Always pat the chicken completely dry before applying the oil or binder. Additionally, leave space between the chicken breasts on the baking sheet to allow air to circulate; if they touch, they will steam instead of bake. Another pitfall is overcooking. Chicken breast is very lean and dries out quickly past 165°F. Rely on a meat thermometer rather than cooking time alone, as oven temperatures can vary. Finally, using too much oil in the breading mixture can make it greasy rather than crisp, so stick to the recommended measurements.
Serving Suggestions
This Baked Garlic Parmesan Chicken is incredibly versatile. For a light, low-carb meal, serve it atop a bed of zucchini noodles (zoodles) tossed in lemon and olive oil, or alongside roasted asparagus and cherry tomatoes. It also pairs beautifully with a crisp Caesar salad or a simple arugula salad with balsamic glaze. If you’re looking for something heartier, place the chicken over a serving of angel hair pasta with a light garlic butter sauce, or serve with roasted baby potatoes and steamed broccoli. A side of marinara sauce for dipping is also a hit with kids.
Storage and Reheating Tips
To store leftovers, allow the chicken to cool completely before placing it in an airtight container. It will keep in the refrigerator for up to 3-4 days. To reheat, avoid the microwave if possible, as it will make the breading soggy and the meat rubbery. Instead, reheat in an oven or toaster oven at 350°F (175°C) for about 10-15 minutes, or until heated through and crispy again. An air fryer is also excellent for reheating—350°F for 3-5 minutes works wonders. You can also freeze the cooked chicken for up to 2 months; thaw overnight in the fridge before reheating.
Nutrition Facts (Estimated)
| Serving Size | 1 chicken breast (approx 6oz) |
| Calories | 285 |
| Fat | 12g |
| Saturated Fat | 3.5g |
| Unsaturated Fat | 7g |
| Trans Fat | 0g |
| Cholesterol | 95mg |
| Sodium | 450mg |
| Carbohydrates | 8g |
| Fiber | 1g |
| Sugar | 1g |
| Protein | 34g |
Frequently Asked Questions
Can I use chicken thighs instead of breasts?
Yes, absolutely! Boneless, skinless chicken thighs are a great alternative. They are juicier and more forgiving if slightly overcooked. However, they may require an extra 5-10 minutes of cooking time depending on their thickness.
How do I make this recipe even lower in calories?
To reduce calories further, you can reduce the amount of Parmesan cheese slightly or use a reduced-fat cheese. You can also use a light cooking spray instead of brushing with olive oil, though the flavor might be less rich.
Why is my breading falling off?
Breading usually falls off if the chicken wasn’t dry enough before coating, or if the coating wasn’t pressed on firmly. Make sure to pat the chicken dry with paper towels and really press the crumb mixture into the meat.
Can I prepare this ahead of time?
You can coat the chicken earlier in the day and keep it covered in the refrigerator for up to 4 hours before baking. However, the breadcrumbs might absorb some moisture, so for the absolute best crunch, bake immediately after coating.
Is this recipe spicy?
No, this recipe is savory and garlic-forward but not spicy. If you want a kick, add 1/2 teaspoon of red pepper flakes or a pinch of cayenne pepper to the breadcrumb mixture.
Do I have to pound the chicken?
Pounding the chicken is highly recommended. Chicken breasts are naturally uneven, with one thick end and one thin end. Pounding them to uniform thickness ensures they cook evenly, preventing the thin end from drying out while the thick end cooks.
Can I make this in an air fryer?
Yes! Preheat your air fryer to 375°F (190°C). Place the coated chicken in the basket in a single layer (cook in batches if needed) and air fry for 12-15 minutes, flipping halfway through, until the internal temperature reaches 165°F.
What is the best way to grate the parmesan?
Use the smallest holes on a box grater or a microplane. Finely grated cheese mixes better with the breadcrumbs and creates a more uniform crust than larger shreds.
Can I use plain breadcrumbs instead of Panko?
You can, but the texture will be different. Panko flakes are larger and airier, resulting in a crunchier crust. Regular breadcrumbs will create a denser, more compact coating.
Conclusion
Baked Garlic Parmesan Chicken Breast is the ultimate proof that healthy eating doesn’t have to mean sacrificing flavor or texture. With its golden, crispy exterior and juicy, garlic-infused interior, this dish satisfies the craving for comfort food while keeping things light and nutritious. It is a recipe that respects your time on busy weeknights yet feels special enough for a weekend dinner. By following the simple tips on moisture control and baking temperature, you can achieve restaurant-quality results right in your own kitchen. We hope this recipe becomes a staple in your home rotation, bringing smiles to your table without the stress. Happy cooking!