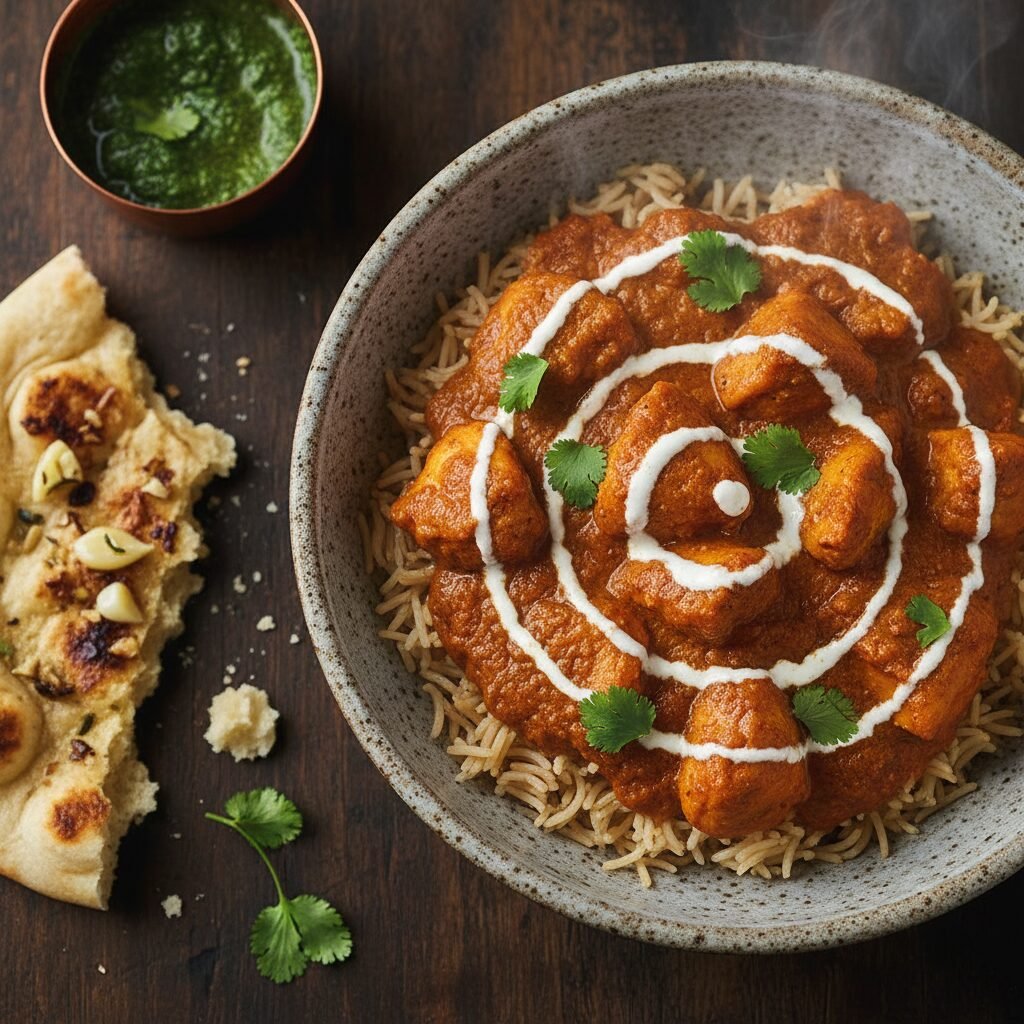
Healthy Chicken Tikka Masala With Brown Rice (Better Than Takeout)
Healthy Chicken Tikka Masala With Brown Rice Recipe
Craving the rich, creamy comfort of Indian takeout without the heavy calories? This Healthy Chicken Tikka Masala swaps heavy cream for aromatic spices and yogurt, served over nutty brown rice for a wholesome, protein-packed dinner that tastes indulgent but fits your wellness goals.
20 minutes
30 minutes
50 minutes
4 Servings
Main Course
Stovetop
Indian-Fusion
Gluten-Free
There is something undeniably magical about the aroma of Indian spices wafting through the kitchen. It signals comfort, warmth, and a depth of flavor that few other cuisines can match. For many of us, Chicken Tikka Masala is the gateway dish—the creamy, tomato-based curry that balances heat with sweetness and richness. However, the traditional restaurant version is often laden with heavy cream, butter, and excess oil, turning a potentially nutritious meal into a caloric splurge. That is exactly why I developed this Healthy Chicken Tikka Masala recipe. I wanted to capture that iconic, velvety texture and bold flavor profile while making it suitable for a weeknight dinner rotation that doesn’t derail my health goals.
This recipe relies on the power of a robust marinade and the natural creaminess of Greek yogurt and a touch of coconut milk, rather than cups of heavy cream. By using lean chicken breast and pairing it with fiber-rich brown rice instead of refined white basmati, we create a balanced macronutrient profile that keeps you full longer. The sauce is built on a foundation of aromatics—ginger, garlic, and onion—and a spice blend that blooms in the pan to release incredible fragrance. Whether you are a meal-prep enthusiast looking for lunches that get better by the day, or simply someone who loves a good curry night, this lighter version of the classic delivers all the satisfaction with none of the guilt.
History & Origins
The history of Chicken Tikka Masala is as rich and layered as the sauce itself, and somewhat surprisingly, its origins are a subject of heated culinary debate. While the dish is rooted in the flavors of the Indian subcontinent, specifically Punjab, it is widely considered a British national treasure. The most popular origin story takes us to Glasgow, Scotland, in the 1970s. Legend has it that a customer at the Shish Mahal restaurant complained that his Chicken Tikka (dry, roasted marinated chicken) was too dry. The chef, Ali Ahmed Aslam, improvised by dumping a can of tomato soup, some spices, and a splash of yogurt over the chicken to create a gravy. The customer loved it, and a star was born.
However, culinary historians also point to the dish’s similarity to Butter Chicken (Murgh Makhani), a traditional North Indian dish created in Delhi in the 1940s. Butter Chicken uses a similar tomato-cream base but tends to be richer and sweeter. Chicken Tikka Masala evolved as the spicier, slightly more complex cousin, adapted to suit the British palate which craved gravy to soak up with naan bread. Regardless of whether it was born in a Glasgow kitchen or evolved from Delhi streets, the dish has become a global phenomenon. In 2001, British Foreign Secretary Robin Cook famously declared it ‘a true British national dish,’ symbolizing the multicultural evolution of the country. This recipe honors that cross-cultural journey by keeping the authentic spice profile while adapting the ingredients for the modern, health-conscious kitchen.
Why This Recipe Works
This recipe succeeds where many ‘healthy’ adaptations fail because it prioritizes technique over shortcuts. Often, low-fat versions of creamy dishes end up thin, watery, or lacking depth. We avoid this by using a two-step marination process. First, the chicken is coated in yogurt and spices. The lactic acid in the yogurt breaks down the protein fibers in the chicken breast, ensuring that even this lean cut remains incredibly tender and juicy after cooking. This mimics the traditional Tandoor oven cooking method where the meat is subjected to high heat but protected by a thick marinade.
Secondly, the depth of flavor comes from ‘blooming’ the spices. Instead of just dumping raw spices into a liquid, we sauté the garam masala, cumin, and turmeric in the aromatic base of onions, garlic, and ginger. This releases the essential oils in the spices, intensifying their flavor profile significantly. For the sauce, we swap heavy cream for a combination of tomato puree and a finish of light coconut milk or Greek yogurt. This provides that necessary velvety mouthfeel and cuts the acidity of the tomatoes without the massive saturated fat content of heavy cream. Finally, pairing the robust sauce with brown rice adds a nutty, chewy texture that holds up beautifully against the curry, unlike white rice which can sometimes get mushy.
Why You’ll Love This Recipe
- ✓High protein and lower fat compared to restaurant versions
- ✓Rich, creamy texture without heavy cream
- ✓Packed with anti-inflammatory spices like turmeric and ginger
- ✓Perfect for meal prep as flavors deepen overnight
- ✓Gluten-free and easily adaptable for dairy-free diets
Equipment You’ll Need
- ✓Large skillet or Dutch oven
- ✓Medium saucepan (for rice)
- ✓Mixing bowls
- ✓Chef’s knife
- ✓Cutting board
- ✓Measuring spoons and cups
- ✓Wooden spoon or spatula
Ingredients
- ✓1.5 lbs Boneless, skinless chicken breasts, cut into 1-inch cubes
- ✓1 cup Plain non-fat Greek yogurt (divided use)
- ✓2 tbsp Lemon juice
- ✓6 cloves Garlic, minced (divided)
- ✓2 tbsp Fresh ginger, grated (divided)
- ✓2 tbsp Garam Masala (divided)
- ✓1 tsp Ground turmeric
- ✓1 tsp Ground cumin
- ✓1 tsp Chili powder or paprika (for mild heat)
- ✓1 tbsp Olive oil or coconut oil
- ✓1 large Yellow onion, finely diced
- ✓1 can (14 oz) Tomato sauce or crushed tomatoes
- ✓1/2 cup Light coconut milk (canned) or half-and-half
- ✓1 cup Uncooked brown rice
- ✓2 cups Water or chicken broth
- ✓Salt and black pepper to taste
- ✓Fresh cilantro, chopped (for garnish)
Instructions
- 1. Prepare the Brown Rice: Rinse the brown rice thoroughly under cold water. In a medium saucepan, combine the rice with 2 cups of water (or broth) and a pinch of salt. Bring to a boil, then reduce heat to low, cover, and simmer for 40-45 minutes until water is absorbed and rice is tender. Remove from heat and let sit covered for 10 minutes before fluffing with a fork.
- 2. Marinate the Chicken: While rice is cooking, combine the chicken cubes, 1/2 cup of Greek yogurt, 1 tablespoon lemon juice, half the garlic, half the ginger, 1 tablespoon Garam Masala, turmeric, cumin, and chili powder in a bowl. Mix well to coat. Let it marinate for at least 15 minutes (or up to overnight in the fridge for best results).
- 3. Sear the Chicken: Heat the olive oil in a large skillet or Dutch oven over medium-high heat. Add the chicken pieces (shaking off excess marinade slightly, but keep the marinade for later if desired, though usually, we discard excess for a cleaner sauce). Cook for about 5-6 minutes until browned on all sides. The chicken doesn’t need to be fully cooked through yet. Remove chicken from the pan and set aside.
- 4. Build the Sauce Base: In the same pan, add the diced onion. Sauté for 5 minutes until soft and translucent. Add the remaining garlic and ginger, cooking for another minute until fragrant.
- 5. Bloom the Spices: Stir in the remaining 1 tablespoon of Garam Masala. Toasting the spices with the onion mixture for 30 seconds brings out their essential oils.
- 6. Simmer: Pour in the tomato sauce. Scrape the bottom of the pan to release any browned bits (fond). Bring to a gentle simmer and let it cook for 10 minutes to thicken slightly and reduce acidity.
- 7. Finish the Curry: Stir in the light coconut milk (or half-and-half). Return the cooked chicken and any accumulated juices back into the pan. Simmer on low heat for another 5-10 minutes until the chicken is cooked through and the sauce reaches your desired consistency.
- 8. Final Touches: Taste and adjust salt and pepper. If the sauce is too acidic, add a pinch of sugar or honey. Remove from heat.
- 9. Serve: Spoon the Tikka Masala over the fluffy brown rice. Garnish generously with fresh cilantro.
Expert Cooking Tips
- ✓Don’t skip the sear: Browning the chicken before simmering adds a layer of flavor (Maillard reaction) that boiling alone cannot achieve.
- ✓Fresh spices matter: If your Garam Masala has been sitting in the cupboard for 3 years, it won’t have the punch you need. Buy fresh spices for the best aroma.
- ✓Adjust the heat: Use Cayenne pepper instead of paprika if you want a spicy kick, or add a diced jalapeño with the onions.
- ✓Yogurt tempering: If you choose to stir extra yogurt into the hot sauce at the end, remove the pan from the heat first to prevent curdling.
- ✓Rice texture: For fluffier brown rice, toast the dry grains in a little oil before adding the water.
- ✓Make it ahead: Curries almost always taste better the next day as the flavors have time to meld together.
Substitutions and Variations
This recipe is incredibly versatile and can be adapted to suit various dietary needs. If you are strictly dairy-free, replace the Greek yogurt in the marinade with coconut yogurt or a dairy-free yogurt alternative, and use full-fat canned coconut milk for the sauce instead of light coconut milk or half-and-half. For the protein, chicken thighs can be used instead of breasts for a juicier result, though this will slightly increase the fat content. Vegetarians can swap the chicken entirely for firm tofu (pressed and cubed) or a mix of chickpeas and roasted cauliflower, which absorb the sauce beautifully. If brown rice isn’t your favorite, serve this over quinoa for a complete protein boost, or stick to traditional Basmati rice. For a low-carb option, cauliflower rice is an excellent vehicle for the rich sauce.
Common Mistakes to Avoid
The most common mistake when making healthier curries is ending up with a thin, watery sauce. This usually happens if the onions and tomatoes aren’t cooked down enough before adding liquids. Ensure you let the tomato sauce simmer until it darkens slightly and thickens. Another frequent error is curdling the dairy. If you are using yogurt to finish the sauce instead of coconut milk, never add it to a boiling pan. High heat causes the proteins in yogurt to separate. Instead, temper the yogurt by mixing a spoonful of hot sauce into the yogurt in a separate bowl before stirring it back into the main pot, or simply remove the pot from the heat completely before stirring it in. Lastly, under-seasoning is a crime in Indian cuisine. Don’t be afraid of the salt; it is necessary to make the spices pop.
Serving Suggestions
While this recipe includes brown rice, the serving possibilities are endless. To mimic the restaurant experience, serve with a side of whole-wheat naan or roti to scoop up the extra sauce. A cooling side dish is essential to balance the spices; a simple cucumber raita (yogurt, grated cucumber, cumin, and mint) works wonders. You can also serve a side of Kachumber salad—a fresh mix of chopped tomatoes, cucumbers, onions, and chili with lemon juice—to add a crunchy, acidic contrast to the creamy curry. For a beverage, a homemade mango lassi made with yogurt and honey is the perfect sweet companion to the savory meal.
Storage and Reheating Tips
Chicken Tikka Masala is one of those magical dishes that tastes even better the next day. Store leftovers in an airtight container in the refrigerator for up to 4 days. To reheat, use the microwave or warm it gently on the stovetop; you may need to add a splash of water or broth if the sauce has thickened too much in the fridge. This dish is also incredibly freezer-friendly. Allow the curry to cool completely, then transfer to freezer-safe bags or containers. It can be frozen for up to 3 months. Thaw overnight in the refrigerator before reheating. Note that freezing cooked rice can sometimes change its texture, so you might prefer to freeze just the curry and cook fresh rice when you are ready to eat.
Nutrition Facts (Estimated)
| Serving Size | 1 bowl (with rice) |
| Calories | 485 |
| Fat | 14g |
| Saturated Fat | 4g |
| Unsaturated Fat | 8g |
| Trans Fat | 0g |
| Cholesterol | 85mg |
| Sodium | 620mg |
| Carbohydrates | 52g |
| Fiber | 6g |
| Sugar | 8g |
| Protein | 38g |
Frequently Asked Questions
Can I make this in a Slow Cooker?
Yes! Sear the chicken and sauté the onions/spices first as per the recipe, then transfer everything (except the finishing coconut milk/cream) to the slow cooker. Cook on Low for 4-6 hours. Stir in the coconut milk during the last 30 minutes.
Is this recipe spicy?
As written, it is mild to medium. The heat comes from the chili powder. If you are sensitive to spice, use sweet paprika instead of chili powder. If you love heat, add cayenne pepper or fresh green chilies.
Why is my sauce orange and not bright red?
Restaurant Tikka Masala is often bright red due to food coloring. Our natural version relies on tomatoes and turmeric, resulting in a beautiful rustic orange color. It tastes just as good without the artificial dye!
Can I use Greek yogurt in the sauce instead of coconut milk?
Yes, you can. It will be tangier. Make sure to use full-fat Greek yogurt for better stability and remove the pan from heat before stirring it in to prevent curdling.
Do I have to use brown rice?
Not at all. Brown rice is chosen for its higher fiber content and nutritional profile, but white Basmati or Jasmine rice are traditional and delicious alternatives.
Can I use rotisserie chicken?
Yes, for a faster version. Skip the chicken marinade step. Sauté the onions and spices, make the sauce, and stir in the shredded rotisserie chicken at the end just to warm it through.
Is Garam Masala the same as Curry Powder?
No. Garam Masala is a specific blend of warming spices (cloves, cinnamon, cardamom) usually added at the end of cooking or bloomed in oil. Curry powder is a British invention often heavy on turmeric. They have different flavor profiles, but you can use curry powder in a pinch.
How do I make the chicken even more tender?
Marinate it longer! The enzymes and acid in the yogurt work over time. Marinating for 8-12 hours will yield the most tender results.
Conclusion
Making Healthy Chicken Tikka Masala at home is a rewarding experience that proves you don’t need to sacrifice flavor for nutrition. By making simple swaps like using brown rice and controlling the amount of fat in the sauce, you can enjoy a comfort food classic any night of the week. The vibrant colors, the intoxicating aroma of ginger and garam masala, and the satisfaction of a home-cooked meal make this recipe a keeper. I hope this dish brings warmth to your table and becomes a favorite for your family just as it has for mine. Don’t forget to tag us on social media if you make it—we love seeing your healthy culinary creations!