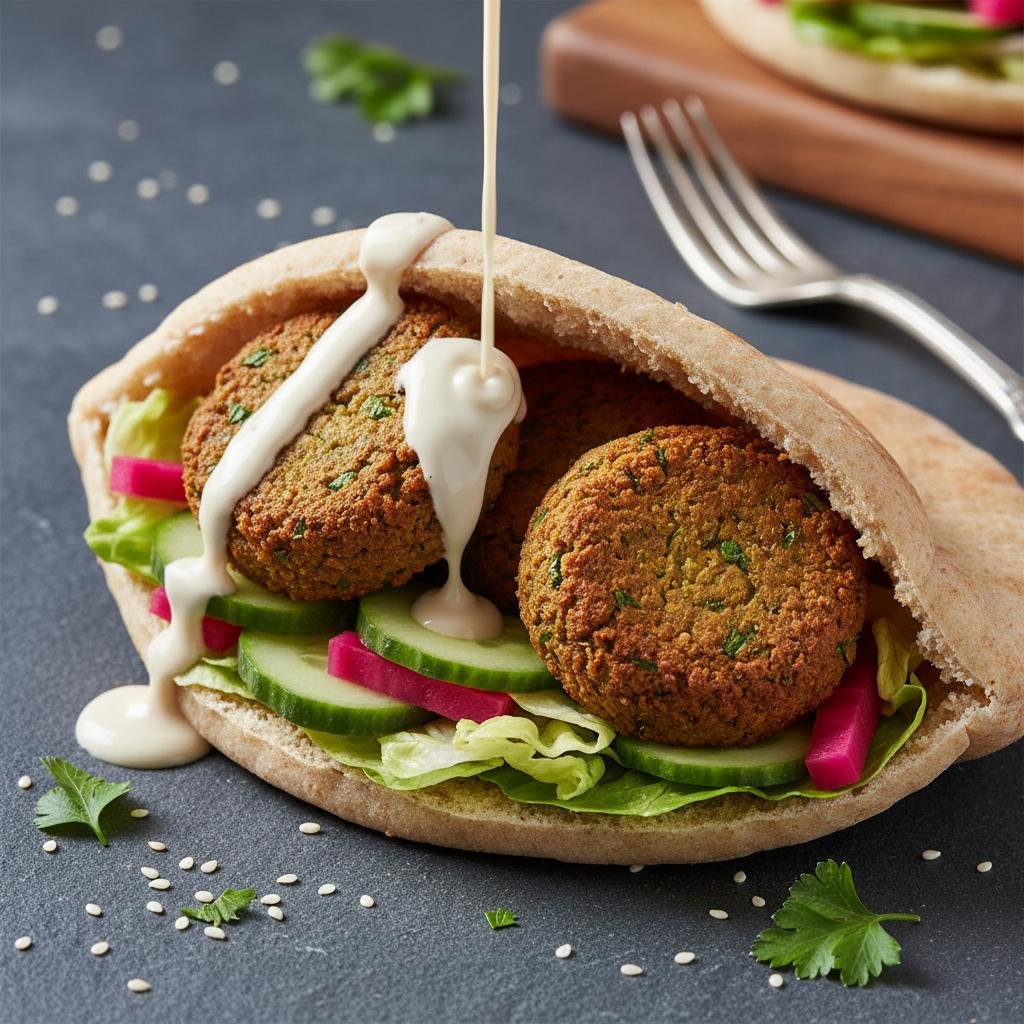
Crispy Baked Falafel Pita with Creamy Lemon Tahini Sauce
Baked Falafel Pita With Tahini Sauce Healthy Recipe
There is something undeniably magical about the combination of warm, spiced chickpeas and cool, creamy sauce wrapped in soft bread. For many of us, falafel is the ultimate street food comfort, a dish that transcends borders and brings a burst of savory satisfaction with every bite. However, the traditional method of deep-frying, while delicious, often relegates this meal to a ‘treat’ category rather than a staple in a health-conscious diet. This Baked Falafel Pita recipe changes the narrative completely, offering all the crunch, aroma, and texture of the authentic version without the heaviness of excess oil. We are talking about golden-brown, herb-flecked spheres of joy that are crispy on the outside and tender, fluffy, and bright green on the inside. The secret lies in the method—using soaked dried chickpeas rather than canned ones—which preserves the structural integrity and prevents the dreaded mushiness that plagues many home-cooked attempts. Paired with a silky, garlicky lemon tahini sauce that cuts through the earthiness of the cumin and coriander, this dish is a symphony of flavors. Whether you are a dedicated vegan, a flexitarian, or simply someone looking to incorporate more plant-based protein into your weekly rotation, this recipe checks every box. It is vibrant, nutrient-dense, and surprisingly easy to pull together on a weeknight. Imagine pulling a tray of sizzling falafels out of the oven, the kitchen filling with the scent of roasting herbs and spices, and assembling a pita bursting with fresh cucumbers, tomatoes, and pickles. This isn’t just a recipe; it is a ticket to a Mediterranean feast right in your own kitchen, perfectly tailored for the modern, healthy lifestyle.
20 minutes (plus overnight soaking)
25 minutes
45 minutes
4 servings (approx. 16 falafels)
Main Course
Baking
Middle Eastern
Vegan
History & Origins
To understand the soul of this dish, we must travel back through centuries of culinary evolution. While falafel is now synonymous with Middle Eastern cuisine globally, its exact origins are a subject of passionate debate, often claimed by multiple cultures across the Levant and North Africa. Most food historians trace the roots of falafel back to Egypt, specifically to the Coptic Christians who sought a hearty, meat-free replacement during Lent. These early versions, known as ‘ta’amiya’, were made primarily with fava beans rather than chickpeas and are still prepared this way in Egypt today. As the dish migrated northwards towards the Levant—modern-day Lebanon, Israel, Palestine, and Syria—the primary ingredient shifted to chickpeas (garbanzo beans), which were abundant in the region. This chickpea version is what the Western world largely recognizes as falafel today. The word itself is thought to derive from the Arabic word ‘filfil’, meaning pepper, alluding to the spicy, rounded nature of the fritters. Over the decades, falafel transitioned from a plated mezze item to the iconic sandwich format we know and love. The introduction of the pita pocket in the mid-20th century revolutionized street food, allowing vendors to stuff these hot, crispy balls into portable bread along with salads and sauces, creating the ultimate fast food. Today, falafel stands as a symbol of cultural heritage and hospitality, a dish that has survived wars and migrations to become a beloved staple on street corners from Cairo to New York City.
Why This Recipe Works
The secret to perfecting falafel at home, especially a baked version, lies entirely in moisture control and texture management. Most home cooks fail by using canned chickpeas, which are already cooked and saturated with water. When you process canned chickpeas, they turn into a wet paste that requires heavy binders like flour or eggs to hold together, resulting in a dense, cake-like texture that lacks the signature crumble. This recipe works because it strictly utilizes dried chickpeas soaked overnight. These rehydrated but raw beans retain their starch and structure. When ground in a food processor, they form a coarse meal that binds to itself naturally during cooking, creating that essential light and fluffy interior. Furthermore, the baking method employed here mimics frying by using a high oven temperature and a generous brushing of olive oil. The high heat ensures the exterior caramelizes and crisps up quickly before the interior dries out. The addition of baking powder is another crucial element; it acts as a leavening agent, giving the falafel a slight lift and airiness that prevents them from becoming heavy leaden balls. Finally, the ratio of fresh herbs—parsley and cilantro—provides moisture and flavor without adding excess liquid, ensuring the falafel stays green and vibrant.
Why You’ll Love This Recipe
- ✓Authentic texture without deep frying
- ✓High in plant-based protein and fiber
- ✓Naturally vegan and easily gluten-free
- ✓Meal prep friendly for busy weeks
- ✓Rich in heart-healthy fats from tahini
- ✓Bursting with fresh herbs and antioxidants
Equipment You’ll Need
- ✓Food Processor
- ✓Large Baking Sheet
- ✓Parchment Paper
- ✓Pastry Brush
- ✓Large Mixing Bowl
- ✓Chef’s Knife
- ✓Whisk
Ingredients
- ✓1 cup dried chickpeas (absolutely NO canned), soaked in water for 12-24 hours
- ✓1/2 large yellow onion, roughly chopped
- ✓3 cloves garlic, peeled
- ✓1 cup fresh parsley leaves, stems removed
- ✓1 cup fresh cilantro leaves, stems removed
- ✓1 tsp ground cumin
- ✓1 tsp ground coriander
- ✓1 tsp sea salt
- ✓1/2 tsp black pepper
- ✓1/4 tsp cayenne pepper (optional for heat)
- ✓2 tbsp chickpea flour (or all-purpose flour)
- ✓1 tsp baking powder
- ✓3 tbsp extra virgin olive oil (for brushing)
- ✓4 whole wheat pita breads
- ✓1/2 cup tahini paste
- ✓1/4 cup fresh lemon juice
- ✓1 clove garlic, minced (for sauce)
- ✓1/4 cup ice-cold water (adjust for consistency)
- ✓Sliced cucumbers, tomatoes, and pickled turnips for serving
Instructions
- 1. The night before, place the dried chickpeas in a large bowl and cover with water by at least 3 inches. Let them soak for 12 to 24 hours. Drain and rinse thoroughly before use.
- 2. Preheat your oven to 400°F (200°C). Line a large baking sheet with parchment paper and grease it lightly with 1 tablespoon of olive oil.
- 3. In a food processor, combine the soaked chickpeas, chopped onion, peeled garlic cloves, parsley, cilantro, cumin, coriander, salt, pepper, and cayenne.
- 4. Pulse the mixture repeatedly until it resembles a coarse meal, similar to the texture of couscous or sand. Do not over-process into a smooth puree; you want texture. You may need to scrape down the sides of the bowl a few times.
- 5. Transfer the mixture to a bowl. Sprinkle in the chickpea flour and baking powder. Mix gently with a spoon or your hands until combined. If the mixture feels too wet, add another teaspoon of flour. If it won’t hold together, pulse it a few more times.
- 6. Form the mixture into small balls or patties, about 1.5 inches in diameter. You should get about 16 falafels. Avoid packing them too tightly, or they will be dense.
- 7. Place the falafels on the prepared baking sheet. Brush the tops and sides generously with the remaining 2 tablespoons of olive oil. This step is crucial for browning.
- 8. Bake for 25-30 minutes, flipping the falafels gently halfway through, until they are golden brown and crispy on the outside.
- 9. While the falafel bakes, prepare the tahini sauce. In a small bowl, whisk together the tahini paste, lemon juice, and minced garlic. The mixture will seize up and become thick. Gradually whisk in the ice-cold water, one tablespoon at a time, until the sauce becomes smooth, creamy, and pourable. Season with salt to taste.
- 10. Warm the pita breads in the oven for the last 2 minutes of baking. Slice open the pitas, spread a layer of tahini sauce inside, stuff with 3-4 falafels, and top with cucumbers, tomatoes, pickles, and extra sauce. Serve immediately.
Expert Cooking Tips
- ✓Never use canned chickpeas; the texture will be mushy and the falafel will fall apart.
- ✓Ensure your fresh herbs are dry after washing to avoid adding excess moisture to the mix.
- ✓Chilling the falafel dough in the refrigerator for 30 minutes before forming balls helps them hold their shape better.
- ✓Don’t skip the baking powder; it is the key to a fluffy interior.
- ✓Use ice water when making the tahini sauce to achieve the lightest color and creamiest emulsion.
- ✓If you want extra crunch, you can broil the falafels for the last 2 minutes of cooking, but watch them closely to prevent burning.
Substitutions and Variations
This recipe is quite versatile when it comes to dietary needs and pantry staples. If you cannot find chickpea flour, regular all-purpose flour, oat flour, or even a gluten-free flour blend works well as a binder. For the herbs, while the combination of parsley and cilantro is traditional, you can use just one or the other if you have a preference or an aversion (like the soap gene for cilantro). If you prefer a different flavor profile, adding fresh dill or mint can provide a lovely twist. For the pita, you can substitute gluten-free wraps, collard green leaves for a low-carb option, or serve the falafel atop a grain bowl with quinoa or brown rice. In the sauce, if you are out of tahini, a yogurt-based sauce (tzatziki) or a hummus dressing can be a delicious alternative, though it changes the flavor profile from the classic sesame nuttiness.
Common Mistakes to Avoid
The most common mistake, by far, is using canned chickpeas. I cannot stress this enough: canned chickpeas are pre-cooked and hold too much water, leading to a paste rather than a crumbly dough. Another frequent error is over-processing the mixture. If you blend it until it looks like hummus, your falafel will be dense and heavy. Aim for a texture that looks like coarse sand or couscous. Additionally, be careful not to overcrowd the baking sheet. If the falafels are touching, they will steam each other instead of roasting, resulting in a soggy exterior. Finally, do not skimp on the oil when brushing. Since we aren’t deep frying, that surface oil is necessary to conduct heat and create the Maillard reaction for that appetizing golden-brown crust.
Serving Suggestions
While the classic pita pocket is the star of the show, there are endless ways to serve these baked falafels. Create a stunning ‘Falafel Mezze Platter’ for a party, featuring the falafels alongside bowls of hummus, babaganoush, tabbouleh, olives, and warm flatbreads. For a lighter lunch, serve them on top of a ‘Falafel Salad’ with mixed greens, cherry tomatoes, cucumber ribbons, feta cheese, and a drizzle of the lemon tahini sauce. They also make excellent appetizers; simply stick a toothpick in each one and serve with a side of spicy harissa dip. If you are meal prepping, pack the falafels, sauce, and veggies in separate containers to keep everything fresh and assemble your pita or bowl right before eating.
Storage and Reheating Tips
Baked falafels store surprisingly well, making them excellent for meal prep. Leftover cooked falafels can be stored in an airtight container in the refrigerator for up to 4-5 days. To reheat, place them in a 350°F (175°C) oven or toaster oven for 10 minutes, or pop them in an air fryer for 3-4 minutes to revive the crispiness. Microwaving is possible but will result in a softer texture. You can also freeze the cooked falafels for up to 3 months; thaw them in the fridge overnight before reheating. Alternatively, you can freeze the raw falafel mixture. Form the balls, freeze them on a baking sheet until solid, then transfer to a freezer bag. You can bake them directly from frozen, just adding a few extra minutes to the cooking time.
Nutrition Facts (Estimated)
| Serving Size | 1 Pita Sandwich |
| Calories | 480 |
| Fat | 18g |
| Saturated Fat | 2.5g |
| Unsaturated Fat | 14g |
| Trans Fat | 0g |
| Cholesterol | 0mg |
| Sodium | 650mg |
| Carbohydrates | 62g |
| Fiber | 12g |
| Sugar | 4g |
| Protein | 18g |
Frequently Asked Questions
Can I absolutely use canned chickpeas if I am in a rush?
It is highly recommended not to. Canned chickpeas are too soft and wet. If you must, you will need to add significantly more flour to bind them, which changes the texture to something more like a veggie burger patty than a light falafel. The result will be denser and less authentic.
Why are my falafels falling apart when I form them?
The mixture might be too dry or too coarse. Try pulsing it a few more times in the processor to make the particles smaller. If it’s still crumbly, add a teaspoon of water or lemon juice. If it’s too wet, add a little more flour.
Can I make this recipe in an air fryer?
Yes! The air fryer is perfect for falafel. Preheat to 375°F (190°C), spray the basket and the falafels with oil, and cook for 12-15 minutes, shaking the basket halfway through. They often come out even crispier than the oven version.
Is this recipe gluten-free?
The falafel balls themselves are gluten-free if you use chickpea flour or a gluten-free flour blend as the binder. To make the entire meal gluten-free, simply serve them with gluten-free pita bread or over a salad.
Why is the inside of my falafel green?
That is exactly what you want! The green color comes from the fresh parsley and cilantro blended into the mix. A vibrant green interior indicates plenty of fresh herbs and a good flavor profile.
Can I use a blender instead of a food processor?
It is difficult to use a blender because it tends to require liquid to run smoothly, which you want to avoid here. A food processor is best for achieving that dry, coarse texture. If you only have a blender, process in very small batches and be careful not to turn it into a paste.
Do I have to peel the chickpeas?
No, peeling is not necessary for falafel. Since you are grinding them up, the skins get incorporated into the mix and add fiber without affecting the texture negatively.
Can I substitute the tahini sauce?
If you have a sesame allergy or dislike tahini, you can use a yogurt-based tzatziki sauce, a garlic aioli, or even a spicy zhug or harissa sauce. However, tahini is the traditional pairing.
Conclusion
Mastering this Baked Falafel Pita recipe opens up a world of healthy, flavorful possibilities right in your own kitchen. It proves that you do not need a deep fryer to achieve that crave-worthy crunch and satisfaction of authentic Middle Eastern street food. By taking the time to soak your chickpeas and blending your own fresh herb mixture, you are rewarded with a meal that is nourishing, wholesome, and incredibly delicious. Whether you are serving these up for a family dinner, packing them for a work lunch, or sharing them with friends on a weekend, they are sure to impress. So, grab your food processor, pick up some fresh pita, and get ready to enjoy one of the best plant-based meals you will ever make. Bon appétit!