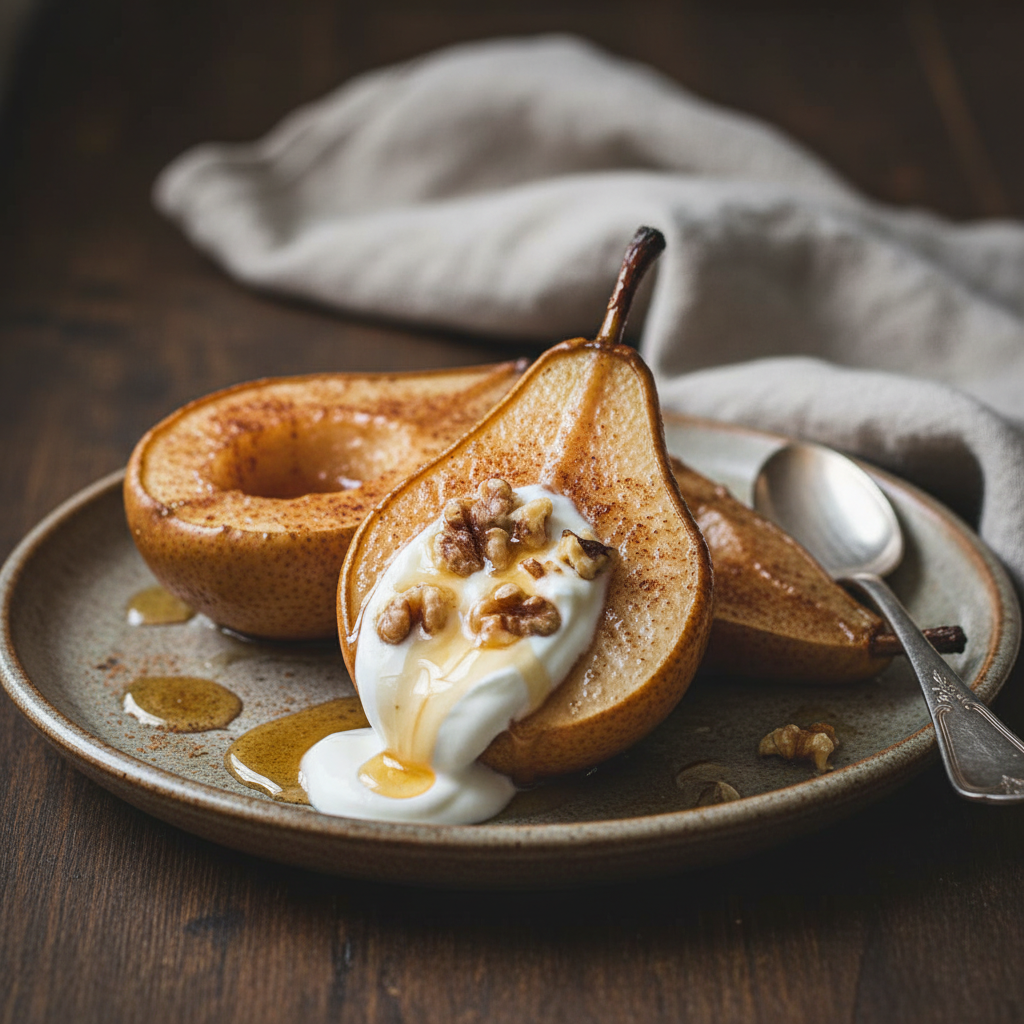
Baked Pears with Cinnamon and Whipped Honey Yogurt
Baked Pear With Cinnamon And Yogurt Topping Recipe
Experience the ultimate cozy comfort food with these tender baked pears, caramelized to perfection with cinnamon and maple syrup. Topped with a cool, creamy dollop of honey-infused Greek yogurt and crunchy walnuts, this recipe bridges the gap between a healthy breakfast and an indulgent dessert.
10 minutes
25 minutes
35 minutes
4 servings
Dessert
Baking
American / Mediterranean Fusion
Gluten-Free
As the days grow shorter and the air turns crisp, there is an innate desire to fill the kitchen with the warming aromas of autumn spices. This recipe for Baked Pears with Cinnamon and Yogurt Topping is the culinary embodiment of that cozy sentiment. It transforms the humble pear into a sophisticated dish that feels luxurious yet remains incredibly wholesome. Unlike heavy cakes or pies that often leave you feeling sluggish, this dessert highlights the natural sweetness of fruit, enhanced merely by heat and spice. The magic begins the moment the pears hit the oven; the high heat softens their fibers, releasing natural juices that mingle with the cinnamon and maple syrup to create a sticky, fragrant glaze.
But the true brilliance of this dish lies in the contrast. The pears emerge from the oven piping hot, tender enough to be cut with a spoon, and radiating warmth. We then crown them with a dollop of chilled, whipped Greek yogurt sweetened with a touch of honey and vanilla. This interplay of hot and cold, soft and creamy, sweet and tangy, creates a sensory experience that is deeply satisfying. Whether you are serving this as an elegant finale to a dinner party or enjoying it as a special weekend breakfast, it promises to delight the palate without the guilt. It is a celebration of seasonal produce, proving that sometimes the simplest ingredients, treated with care, yield the most extraordinary results. Prepare to fall in love with a dish that is as nourishing for the body as it is for the soul.
History & Origins
The consumption of pears dates back thousands of years, with evidence of their cultivation found in prehistoric pile dwellings around Lake Zurich. However, the art of baking or stewing pears has its roots deeply embedded in ancient history. In Homer’s ‘The Odyssey,’ pears are listed among the ‘gifts of the gods,’ growing in the garden of Alcinous. The ancient Romans, who cultivated over 50 varieties of pears, were known to stew them with honey and spices, a precursor to the modern baked pear. They understood that cooking the fruit not only enhanced its sweetness but also extended its shelf life and made it easier to digest.
As culinary practices evolved through the Middle Ages in Europe, cooked fruit dishes became a staple at banquets. Pears were often poached in wine or baked in embers, flavored with exotic spices like cinnamon and cloves brought back from the Crusades. In 17th-century France, the pear became a symbol of nobility and luxury. King Louis XIV was a renowned admirer of the fruit, and his gardeners at Versailles competed to grow the most exquisite varieties. It was during this era that fruit desserts became more refined, moving from simple roasted dishes to elegant presentations involving creams and custards. The specific combination of baked fruit with cultured dairy, like yogurt or crème fraîche, bridges Middle Eastern and European traditions. In the Middle East, yogurt is a dietary staple often paired with fruits and honey. This recipe is a modern amalgamation of these ancient traditions, combining the Roman love for spiced, cooked fruit with the creamy, tangy dairy elements found in Mediterranean cuisine, resulting in a timeless dish that transcends borders.
Why This Recipe Works
This recipe succeeds because it leverages the science of caramelization and the principles of flavor balancing. When pears are baked at a moderate-to-high temperature, the water content within the fruit cells expands and eventually evaporates, concentrating the natural sugars (fructose). Simultaneously, the Maillard reaction and caramelization processes begin on the surface where the maple syrup and fruit sugars meet the heat. This creates a depth of flavor that raw fruit simply cannot possess—notes of toffee, butterscotch, and roasted nuts emerge.
Texturally, baking breaks down the hemicellulose and pectin in the cell walls, transforming the pear from crisp and gritty to buttery and smooth. However, a soft, sweet pear can be one-dimensional on its own. This is where the yogurt topping becomes essential. The Greek yogurt introduces acidity and fat. The lactic acid in the yogurt cuts through the intense sweetness of the maple syrup and the richness of the baked fruit, cleansing the palate and making each bite refreshing. The fat in the yogurt carries the flavor compounds of the vanilla and cinnamon, coating the tongue and prolonging the aftertaste. Finally, the addition of walnuts provides a necessary textural contrast, introducing a crunch that prevents the dish from being entirely soft. It is a perfect triad of flavor (sweet/sour), temperature (hot/cold), and texture (soft/crunchy).
Why You’ll Love This Recipe
- ✓Naturally gluten-free and easily adaptable for vegan diets.
- ✓Requires only 10 minutes of active preparation time.
- ✓A healthy alternative to heavy, sugar-laden desserts.
- ✓Perfect balance of warm spices and cool, creamy tang.
- ✓Looks elegant enough for dinner parties but simple enough for breakfast.
Equipment You’ll Need
- ✓Baking sheet or ceramic baking dish
- ✓Parchment paper
- ✓Melon baller or small spoon
- ✓Small mixing bowl
- ✓Whisk
- ✓Chef’s knife
- ✓Cutting board
Ingredients
- ✓2 large ripe but firm pears (Bosc or Anjou)
- ✓1 tablespoon melted butter or coconut oil
- ✓2 tablespoons maple syrup or honey
- ✓1 teaspoon ground cinnamon
- ✓1/4 teaspoon ground nutmeg
- ✓1 cup plain Greek yogurt (full fat recommended)
- ✓1 tablespoon honey (for the yogurt)
- ✓1/2 teaspoon vanilla extract
- ✓1/4 cup chopped walnuts or pecans
- ✓Pinch of sea salt
Instructions
- Preheat your oven to 375°F (190°C). Line a baking sheet or baking dish with parchment paper for easy cleanup.
- Wash the pears thoroughly and dry them. Slice each pear in half lengthwise.
- Using a melon baller or a small spoon, carefully scoop out the core and seeds from the center of each pear half. You can also slice a small sliver off the rounded back of each pear half so they sit flat on the baking sheet without wobbling.
- Place the pears cut-side up on the prepared baking dish.
- In a small bowl, whisk together the melted butter (or coconut oil), maple syrup, cinnamon, and nutmeg.
- Brush this mixture generously over the cut side of the pears, ensuring the hollowed-out center gets a pool of the liquid.
- Bake in the preheated oven for 25-30 minutes. The exact time will depend on the ripeness of your pears. You want them to be tender when pierced with a fork, but not collapsing.
- While the pears are baking, prepare the topping. In a medium bowl, whisk together the Greek yogurt, honey, and vanilla extract until light and fluffy.
- Toast the chopped walnuts in a dry pan over medium heat for 2-3 minutes until fragrant, watching closely to ensure they don’t burn.
- Remove the pears from the oven and let them cool for about 5 minutes. They should be warm, but not piping hot, to prevent the yogurt from melting instantly.
- Dollop a generous amount of the vanilla yogurt mixture into the center of each pear.
- Sprinkle with the toasted walnuts and a tiny pinch of sea salt to finish. Serve immediately.
Expert Cooking Tips
- ✓Choose the right pear: Bosc and Anjou varieties hold their shape best when baked. Bartletts can become too mushy.
- ✓Don’t peel the pears: The skin holds the fruit together and adds a nice texture and fiber boost.
- ✓Stability hack: If your pears are rolling around on the tray, slice a thin piece off the bottom of the curved side to create a flat base.
- ✓Toast the nuts: Never skip toasting the nuts; it releases their essential oils and makes them significantly crunchier.
- ✓Watch the sugar: If your pears are very ripe, you might want to reduce the maple syrup slightly to avoid an overly sweet dish.
Substitutions and Variations
This recipe is incredibly versatile and welcomes substitutions based on dietary needs or pantry availability. For the fruit, while Bosc and Anjou are preferred, firm apples like Honeycrisp or Granny Smith can be prepared in the exact same way, though they may require an extra 5-10 minutes in the oven. If you are vegan or dairy-free, replace the Greek yogurt with a thick coconut yogurt or an almond milk-based yogurt; just ensure it is thick enough to hold its shape. The butter can be swapped for coconut oil or even a neutral avocado oil. For the sweetener, maple syrup offers a rich, autumnal flavor, but honey, agave nectar, or even brown sugar work beautifully. If you have a nut allergy, replace the walnuts with pumpkin seeds (pepitas), sunflower seeds, or a sprinkle of granola for that essential crunch. Spices can also be adjusted; cardamom, ginger, or pumpkin pie spice are excellent alternatives to nutmeg.
Common Mistakes to Avoid
The most common mistake when making baked pears is choosing fruit that is either too ripe or too under-ripe. If the pear is rock hard, it won’t soften enough to be pleasant; if it’s already soft to the touch, it will turn into applesauce in the oven. Look for pears that are firm but have a slight give near the stem. Another frequent error is overbaking. You want the pear to retain some structural integrity, not collapse into a puddle. Check them at the 20-minute mark. Furthermore, do not put the yogurt on immediately after removing the pears from the oven. If the fruit is blazing hot, the yogurt will separate and melt into a watery mess. Allow the fruit to cool for at least 5-10 minutes so it is warm, not scalding. Finally, do not skip the coring step properly; biting into a hard seed or fibrous core ruins the eating experience.
Serving Suggestions
These baked pears are a chameleon in the kitchen. Served warm with the yogurt topping, they make a sophisticated, light dessert following a heavy winter meal like a roast or stew. However, they are equally at home on the breakfast table. You can serve them alongside oatmeal or granola for a hearty start to the day. For a more decadent dessert version, swap the yogurt for a scoop of vanilla bean ice cream or a dollop of mascarpone cheese. If you are hosting a brunch, arrange them on a large platter garnished with fresh mint leaves and a dusting of powdered sugar. They pair wonderfully with a hot cup of chai tea, coffee, or a dessert wine like a Riesling or Moscato.
Storage and Reheating Tips
Baked pears are best enjoyed fresh while warm, but they can be stored successfully. Place any leftover baked pears in an airtight container in the refrigerator for up to 3-4 days. Store the yogurt topping and nuts in separate containers to prevent sogginess. To reheat, place the pears in a microwave-safe dish and heat for 45-60 seconds, or warm them in a 350°F oven for 10 minutes. Do not reheat them with the yogurt on top. Assemble the dish with the cold yogurt and nuts just before eating. Note that the pears will soften more upon reheating, so they may be softer than when first baked. Freezing is not recommended as the texture of the pear becomes unpleasantly mushy upon thawing.
Nutrition Facts (Estimated)
| Serving Size | 1 pear half with toppings |
| Calories | 190 |
| Fat | 6g |
| Saturated Fat | 1g |
| Unsaturated Fat | 5g |
| Trans Fat | 0g |
| Cholesterol | 5mg |
| Sodium | 15mg |
| Carbohydrates | 32g |
| Fiber | 5g |
| Sugar | 22g |
| Protein | 6g |
Frequently Asked Questions
Can I use Bartlett pears for this recipe?
You can, but be careful. Bartlett pears are juicier and softer than Bosc or Anjou. They tend to lose their shape and can become mushy when baked. If you must use them, reduce the baking time by 5-10 minutes.
Do I have to peel the pears?
No, please don’t! The skin helps the pear hold its shape during the baking process. It also becomes tender when baked and adds valuable fiber and nutrients to the dish.
Can I make this recipe vegan?
Absolutely. Simply substitute the butter with coconut oil and use a plant-based yogurt, such as coconut or almond yogurt. Maple syrup is already vegan-friendly.
How do I know when the pears are done?
The pears are done when you can easily slide a fork or a paring knife into the thickest part of the flesh with little resistance. They should be tender but not falling apart.
Can I prep this ahead of time?
Yes. You can halve and core the pears a few hours in advance. Brush them with a little lemon juice to prevent browning before storing them in the fridge. Bake them just before you intend to serve.
Is this dish healthy?
Yes, it is a very healthy dessert option. Pears are high in fiber and vitamin C. Greek yogurt provides protein and probiotics. It is much lower in refined sugars and fats than cakes or cookies.
What if I don’t like cinnamon?
You can customize the spices to your liking. Cardamom is a fantastic alternative that pairs well with pears. Ginger, allspice, or even a vanilla bean paste are great options.
Can I use savory toppings instead?
Yes! For a savory appetizer version, skip the cinnamon and maple syrup. Instead, bake the pears with a little olive oil and thyme, then top with goat cheese or blue cheese and walnuts.
Conclusion
There is something profoundly grounding about taking a simple piece of fruit and transforming it into a dish that feels like a warm hug. These Baked Pears with Cinnamon and Yogurt Topping offer the perfect antidote to the complexity of modern life—they are easy to make, humble in their ingredients, yet rich in flavor and comfort. Whether you are looking for a healthy treat to satisfy a sweet tooth, a festive addition to a holiday brunch, or a quick dessert for unexpected guests, this recipe delivers every time. The juxtaposition of the warm, spiced fruit against the cool, creamy yogurt is a timeless combination that never fails to impress. So, grab a few pears, preheat your oven, and get ready to enjoy one of the season’s most delightful and nutritious offerings.