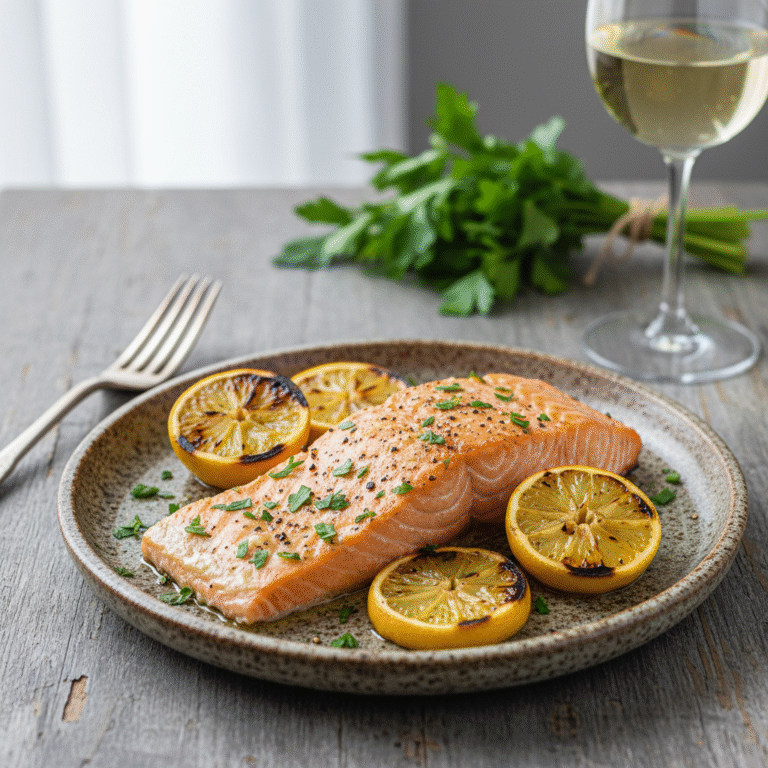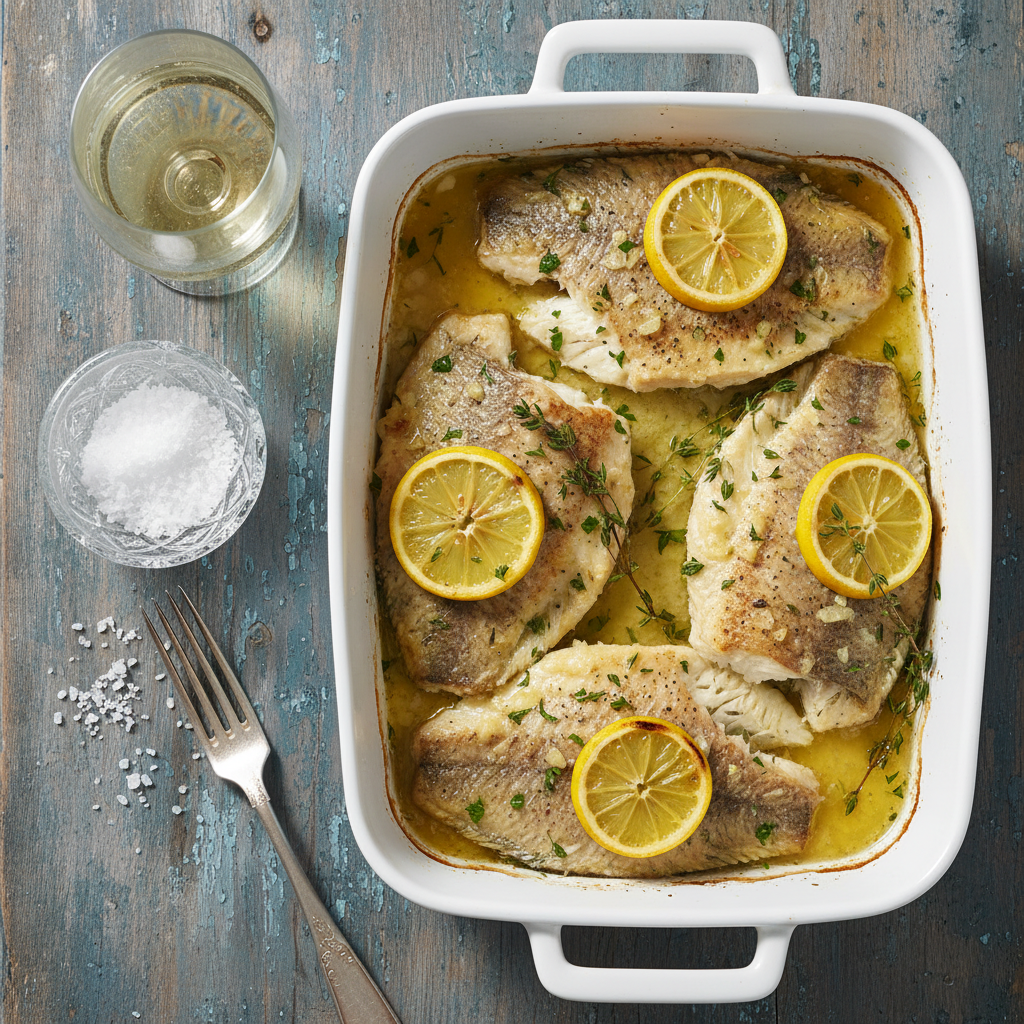
Garlic Butter Baked Tilapia With Lemon And Herbs: A 20-Minute Healthy Dinner
Baked Tilapia With Lemon And Herbs Healthy Recipe
This Garlic Butter Baked Tilapia is the ultimate healthy weeknight dinner, ready in under 20 minutes. Featuring tender, flaky white fish smothered in a vibrant lemon-herb garlic butter sauce, it is a low-carb, keto-friendly meal that the whole family will adore.
5 minutes
12 minutes
17 minutes
4 servings
Main Course
Baking
American / Mediterranean Fusion
Gluten-Free
If there is one protein that often gets overlooked in the hustle and bustle of weeknight meal planning, it is the humble tilapia. Often dismissed for its mild flavor, this white fish is actually the perfect culinary canvas, waiting to be transformed into something spectacular. In this Baked Tilapia with Lemon and Herbs recipe, we are taking the delicate, flaky texture of fresh tilapia and elevating it with a classic, foolproof flavor combination: zesty lemon, aromatic garlic, and a garden’s worth of fresh herbs.
As a food blogger who is constantly on the hunt for meals that bridge the gap between ‘healthy’ and ‘comfort food,’ this recipe has become a staple in my kitchen. The magic lies in the simplicity. You do not need fancy equipment or hours of marinating time. The oven does most of the heavy lifting here, gently cooking the fish until it is perfectly opaque and fork-tender. The sauce—a luscious mixture of melted butter (or olive oil for a dairy-free option), minced garlic, parsley, dill, and freshly squeezed lemon juice—seeps into every crevice of the fillets, ensuring that every bite is bursting with bright, savory goodness.
What I love most about this dish is its versatility. It is light enough for a summer lunch served alongside a crisp arugula salad, yet hearty enough for a cozy winter dinner when paired with roasted root vegetables or a warm quinoa pilaf. Plus, it is incredibly forgiving. If you are new to cooking fish, tilapia is an excellent place to start because it is relatively inexpensive and holds together well during baking. This isn’t just a recipe; it’s a solution for those frantic 5:00 PM moments when you need something nutritious on the table, fast. Get ready to fall in love with seafood all over again.
History & Origins
The history of tilapia consumption is as deep and flowing as the Nile River itself. While often viewed as a modern supermarket staple, tilapia has ancient roots that trace back thousands of years. In fact, it was one of the primary fish caught and consumed in Ancient Egypt. Hieroglyphs dating back to 2500 BC depict the harvesting of tilapia in the Nile, where the fish was not only a vital food source but also held symbolic significance, representing rebirth and regeneration due to its unique mouth-brooding reproductive habits. It is often referred to as ‘St. Peter’s Fish,’ a nod to the biblical account in the Gospel of Matthew where the Apostle Peter catches a fish carrying a coin in its mouth, which many scholars believe was a tilapia native to the Sea of Galilee.
Culturally, the preparation of white fish with lemon and herbs is deeply embedded in Mediterranean cuisine. Coastal communities across Greece, Italy, and Southern France have long understood that the acidity of citrus is the perfect foil for the natural oils found in seafood. Lemon juice acts as a brightener, cutting through richness and enhancing the delicate sweetness of the meat without overpowering it. The addition of herbs like oregano, thyme, parsley, and dill reflects the agrarian history of these regions, where wild herbs grew abundantly and were used to preserve and flavor fresh catches.
In the United States, tilapia’s popularity surged in the late 20th and early 21st centuries as aquaculture technologies improved, making it an affordable and sustainable source of lean protein. Unlike wild-caught stocks which can fluctuate, farmed tilapia provided a consistent supply. Today, this recipe represents a fusion of that ancient Mediterranean culinary wisdom—using simple, fresh acids and aromatics—applied to a globally accessible fish, bridging the gap between old-world tradition and modern convenience.
Why This Recipe Works
This recipe succeeds because it fundamentally understands the delicate nature of tilapia. Tilapia is a lean white fish with a very mild, almost sweet flavor and a texture that can easily become dry or rubbery if overcooked. Baking it at a moderate-to-high temperature (400°F) is the key to success. This temperature is hot enough to roast the garlic and bloom the herbs, releasing their essential oils into the butter, but gentle enough to cook the fish quickly without drawing out all its moisture.
Furthermore, the ‘en papillote’ style influence—even if we aren’t sealing it in paper—is at play here. By arranging the fish in a single layer and topping it with the fat (butter/oil) and lemon slices, we create a self-basting environment. As the butter melts, it mixes with the releasing juices of the fish and the lemon acid to create an instant emulsion or pan sauce right in the baking dish. This ensures the fish remains succulent.
The flavor profile works on the principle of balance. Fish is naturally savory (umami) but mild. The garlic provides a pungent, spicy kick; the herbs add fresh, grassy, and floral notes; and the lemon provides the necessary acid to ‘wake up’ the palate. Without the acid, the butter might feel too heavy; without the fat, the lemon would be too sharp. Together, they create a harmony that coats the tongue and makes the lean protein feel decadent. Finally, adding the herbs at two stages—dried or hardy herbs during cooking and fresh soft herbs (like parsley) after cooking—ensures you get both the deep, infused flavor and the bright, fresh finish.
Why You’ll Love This Recipe
- ✓Ready in under 20 minutes from prep to plate.
- ✓High in lean protein and low in carbohydrates.
- ✓Uses pantry-staple ingredients like garlic, butter, and lemon.
- ✓Kid-friendly mild flavor that isn’t ‘fishy’.
- ✓One-pan cleanup makes it perfect for busy weeknights.
Equipment You’ll Need
- ✓9×13 Baking Dish
- ✓Small Mixing Bowl
- ✓Whisk or Fork
- ✓Chef’s Knife
- ✓Cutting Board
- ✓Measuring Spoons
Ingredients
- ✓4 fresh tilapia fillets (approx. 6oz each), patted dry
- ✓3 tablespoons unsalted butter, melted (or olive oil)
- ✓3 cloves garlic, minced
- ✓1 teaspoon dried oregano
- ✓1/2 teaspoon dried thyme
- ✓1/2 teaspoon paprika (for color)
- ✓Salt and freshly cracked black pepper, to taste
- ✓1 large lemon (half sliced into rounds, half juiced)
- ✓2 tablespoons fresh parsley, chopped (for garnish)
- ✓Optional: 1/4 teaspoon red pepper flakes for heat
Instructions
- Preheat your oven to 400°F (200°C). lightly grease a 9×13 inch baking dish with cooking spray or a little olive oil.
- Pat the tilapia fillets dry with paper towels. This is crucial for texture. Place them side-by-side in the prepared baking dish, ensuring they do not overlap significantly.
- In a small mixing bowl, combine the melted butter, minced garlic, lemon juice (from half the lemon), dried oregano, dried thyme, paprika, salt, and black pepper. Whisk until well combined.
- Pour the butter mixture evenly over the tilapia fillets. Use a pastry brush or the back of a spoon to ensure every inch of the fish is coated in the sauce.
- Arrange the thin lemon slices on top of the fish and around the pan. These will release oils as they bake and look beautiful for presentation.
- Bake in the preheated oven for 10-12 minutes. The cooking time will depend on the thickness of your fillets. The fish is done when it turns opaque white and flakes easily with a fork.
- Remove from the oven. Spoon the pan juices over the fish one last time to moisten.
- Garnish generously with fresh chopped parsley and serve immediately with extra lemon wedges on the side.
Expert Cooking Tips
- ✓Pat the fish dry completely before adding the sauce; this prevents the sauce from sliding off and the fish from steaming in excess water.
- ✓Do not overcook the tilapia. It cooks very fast. Check it at the 10-minute mark.
- ✓If using frozen tilapia, ensure it is completely thawed in the refrigerator overnight before baking for even cooking.
- ✓For a crispy top, broil the fish for the last 1-2 minutes of cooking, but watch it closely to prevent burning the garlic.
- ✓Use fresh lemon juice, not bottled. The flavor difference is significant in simple recipes like this.
- ✓If your fillets are of uneven thickness, tuck the thin tail end under the fillet to create a uniform thickness for even baking.
Substitutions and Variations
This recipe is incredibly flexible and allows for numerous substitutions based on your dietary needs or pantry inventory. If you do not have tilapia, this method works beautifully with other lean white fish such as cod, halibut, haddock, or flounder; just adjust the cooking time slightly for thicker cuts like cod. For a dairy-free or Paleo version, swap the melted butter for high-quality extra virgin olive oil or avocado oil; the flavor will be slightly more grassy but equally delicious. If fresh garlic isn’t available, you can use 1 teaspoon of garlic powder, though fresh is highly recommended for the best aromatic punch. Regarding herbs, feel free to mix and match. Dried basil, Italian seasoning blends, or even dill can replace the oregano and thyme. If you want a spicy kick, add Cajun seasoning or a pinch of cayenne pepper to the butter mixture. For those watching sodium intake, simply omit the added salt and rely on the lemon juice and garlic for flavor.
Common Mistakes to Avoid
The most common mistake when baking tilapia is overcooking it. Because tilapia fillets are generally thin, they can go from tender to dry and rubbery in a matter of minutes. Trust the fork test—if it flakes, it’s done. Another error is not drying the fish before baking. Tilapia releases water as it cooks, and if you start with wet fish, you will end up poaching it in a watery liquid rather than roasting it in the butter sauce. Avoid using old or bottled lemon juice, which can have a metallic or overly acidic taste that ruins the delicate flavor of the fish. Finally, don’t overcrowd the pan. If the fillets are smashed against each other, they will steam instead of bake. Give them a little breathing room to ensure the heat circulates properly.
Serving Suggestions
This lemon herb tilapia is a versatile main that pairs well with a variety of sides. For a low-carb or keto meal, serve it alongside roasted asparagus, steamed broccoli, or cauliflower rice. The lemon butter sauce from the pan makes an excellent dressing for these vegetables. If you aren’t restricting carbs, this fish is wonderful served over a bed of fluffy jasmine rice, quinoa, or angel hair pasta tossed with olive oil and parmesan. A fresh Greek salad with cucumbers, tomatoes, olives, and feta cheese also complements the Mediterranean flavors of the dish perfectly. For a beverage pairing, a crisp, dry white wine like a Sauvignon Blanc or Pinot Grigio cuts through the buttery sauce beautifully.
Storage and Reheating Tips
Leftover baked tilapia is best consumed within 3 days. Store it in an airtight container in the refrigerator. To reheat, it is best to avoid the microwave if possible, as it can make the fish rubbery and release a strong odor. Instead, reheat it gently in a skillet over low heat with a splash of water or broth, covering it until it is warmed through. Alternatively, reheat in the oven at 275°F for about 10-15 minutes. If you must use a microwave, use a lower power setting and heat in short 30-second bursts. We do not recommend freezing cooked tilapia, as the texture tends to become mushy upon thawing and reheating.
Nutrition Facts (Estimated)
| Serving Size | 1 fillet |
| Calories | 210 |
| Fat | 11g |
| Saturated Fat | 6g |
| Unsaturated Fat | 4g |
| Trans Fat | 0g |
| Cholesterol | 75mg |
| Sodium | 280mg |
| Carbohydrates | 2g |
| Fiber | 0.5g |
| Sugar | 0g |
| Protein | 23g |
Frequently Asked Questions
Can I use frozen tilapia for this recipe?
Yes, you can use frozen tilapia, but it must be fully thawed before baking. Thaw it in the refrigerator overnight or seal it in a bag and submerge it in cold water for 30 minutes. Baking frozen fish directly will result in uneven cooking and a watery sauce.
How do I know when the tilapia is done?
The fish is done when the color changes from translucent pinkish-white to opaque solid white. When you insert a fork into the thickest part and twist gently, the flesh should flake apart easily.
Is tilapia healthy?
Yes, tilapia is a nutritious choice. It is a lean source of protein, low in calories and fat, and contains essential vitamins and minerals like Vitamin B12, niacin, and selenium.
Can I use dried herbs instead of fresh?
Absolutely. This recipe calls for dried oregano and thyme for the baking process because they withstand heat well. We recommend using fresh parsley at the end for a burst of color and fresh flavor.
Why does my tilapia taste muddy?
A ‘muddy’ taste can sometimes occur in lower-quality farmed tilapia depending on the environment it was raised in. To avoid this, buy from reputable sources (look for certification from the Aquaculture Stewardship Council or Best Aquaculture Practices).Soaking the fish in milk or water with lemon juice for 20 minutes before cooking can also help neutralize off-flavors.
Can I make this recipe in an air fryer?
Yes! Preheat your air fryer to 375°F. Place the seasoned fillets in the basket (you may need to do this in batches) and cook for 8-10 minutes.
Is this recipe Keto-friendly?
Yes, this recipe is very Keto-friendly. It contains high-quality fats from the butter and protein from the fish, with negligible carbohydrates.
Can I prepare this ahead of time?
You can mix the butter and herb sauce ahead of time and store it in the fridge. However, we recommend baking the fish right before you intend to eat it for the best texture.
Conclusion
There you have it—a foolproof, delicious, and healthy Baked Tilapia recipe that proves fast food can be good food. Whether you are a seasoned home cook or just starting your culinary journey, this dish delivers restaurant-quality flavors with minimal effort. The combination of bright lemon, earthy herbs, and rich garlic butter transforms a simple fillet into a meal worth savoring. I hope this recipe earns a permanent spot in your weekly rotation just as it has in mine. Don’t forget to pin this recipe to your Healthy Dinner board on Pinterest, and leave a comment below letting me know what sides you paired it with!