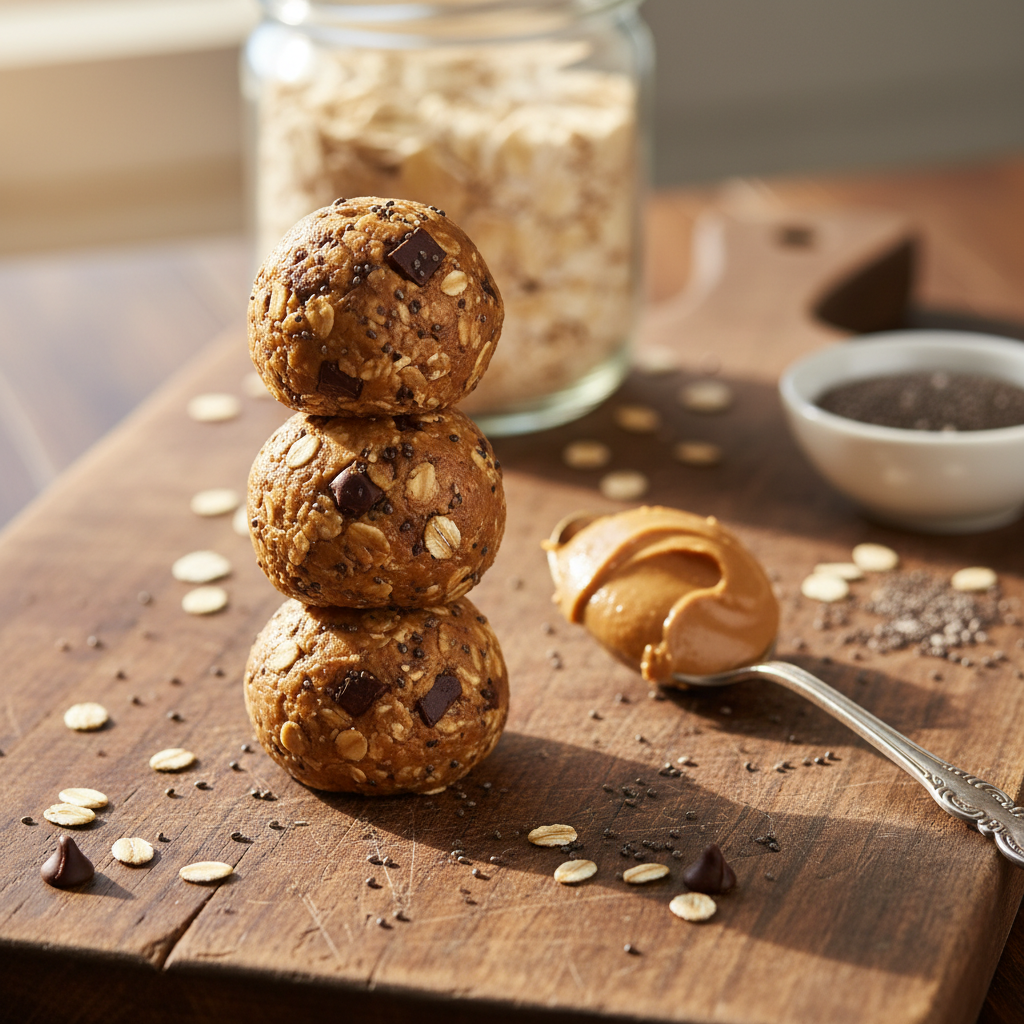
No-Bake Peanut Butter Protein Balls with Chia Seeds
Peanut Butter Protein Ball With Chia Seeds Recipe
These irresistible Peanut Butter Protein Balls are the ultimate grab-and-go snack, packed with creamy peanut butter, crunchy chia seeds, and wholesome oats. Ready in just 15 minutes, they offer a perfect balance of protein and fiber to keep you fueled throughout the day.
15 minutes
0 minutes
45 minutes (includes chilling)
16 balls
Snack
No-Bake
American / Health Food
Gluten-Free
In the fast-paced world we live in, finding a snack that is both nutritious and genuinely delicious can feel like an endless quest. Enter the Peanut Butter Protein Ball with Chia Seeds—a bite-sized powerhouse that has taken the health food community by storm. These little spheres of energy are not just a trend; they are a testament to how simple ingredients can come together to create something truly magical. Imagine the rich, creamy texture of natural peanut butter melding perfectly with the chewy heartiness of rolled oats, all punctuated by the subtle, satisfying crunch of nutrient-dense chia seeds. This recipe is designed for the busy parent, the fitness enthusiast, and the sweet-tooth snacker alike. Unlike store-bought protein bars which can be laden with artificial preservatives and unpronounceable ingredients, these homemade bites are transparent, clean, and customizable. The addition of chia seeds elevates the nutritional profile significantly, introducing a boost of Omega-3 fatty acids, fiber, and antioxidants without altering the classic peanut butter cookie dough flavor we all crave. Whether you are looking for a pre-workout boost, a midday pick-me-up to combat the 3 PM slump, or a guilt-free dessert to enjoy after dinner, these protein balls deliver on all fronts. They require absolutely no baking, meaning you won’t heat up your kitchen, and they come together in a single bowl, minimizing cleanup. As we dive into this recipe, prepare to discover your new meal-prep staple that promises to keep your energy levels stable and your taste buds singing.
History & Origins
The concept of the ‘energy ball’ or ‘protein bite’ is a modern evolution of portable nutrition that traces its roots back much further than the Instagram fitness craze of the 2010s. Historically, humans have long sought dense, portable energy sources for long journeys. Native Americans, for instance, created pemmican—a concentrated mixture of fat and protein—to sustain them during travel. However, the direct ancestor of the modern sweet energy ball is likely the ‘granola’ movement of the 1960s and 70s in the United States, where health enthusiasts began combining oats, nuts, and honey as a rebellion against processed sugary cereals. As the fitness industry boomed in the late 20th century, the focus shifted towards higher protein content. Peanut butter, a staple in American pantries since the early 1900s thanks to pioneers like George Washington Carver and Marcellus Gilmore Edson, became the natural base for these snacks due to its affordability, shelf stability, and protein density. The integration of chia seeds adds an ancient twist; cultivated by the Aztecs and Mayans centuries ago, ‘chia’ (meaning strength) was a prized crop used to fuel runners and warriors. The modern resurgence of chia seeds in the early 21st century, popularized by books like ‘Born to Run’, saw them moving from novelty ‘Chia Pets’ to a superfood pantry staple. Today’s Peanut Butter Protein Ball represents the convergence of these histories: the ancient endurance food of the Americas, the mid-century health food revolution, and the contemporary demand for convenient, high-protein, plant-based nutrition.
Why This Recipe Works
This recipe succeeds where many others fail because of the precise ratio of wet to dry ingredients, ensuring a texture that is fudge-like rather than crumbly or sticky. Many no-bake energy bite recipes suffer from being too dry, requiring the addition of excessive oil, or too wet, making them impossible to roll into shapes. Here, the natural oils in the peanut butter act as the primary binder, while the honey or maple syrup adds stickiness and pliability. The rolled oats provide the structural integrity, absorbing just enough moisture to soften without becoming mushy. The secret weapon, however, is the chia seeds. Beyond their nutritional value, chia seeds are hydrophilic; they absorb liquid and develop a gelatinous coating. In this recipe, they help lock in moisture, preventing the balls from drying out over time while simultaneously acting as a secondary binder to hold everything together. Furthermore, the inclusion of protein powder (optional but recommended) fortifies the structure, making the balls firmer and more satisfying. The balance of salt is also crucial; a pinch of sea salt cuts through the richness of the peanut butter and the sweetness of the honey, creating a complex flavor profile that triggers the ‘bliss point’ without being cloying. This synergy of texture, flavor balance, and chemical binding makes this specific formula fool-proof and highly satisfying.
Why You’ll Love This Recipe
- ✓Requires zero baking and keeps the kitchen cool.
- ✓Packed with plant-based protein and heart-healthy Omega-3s.
- ✓Ready to eat in under 20 minutes.
- ✓Highly customizable with various mix-ins like chocolate chips or dried fruit.
- ✓Perfect for meal prep and freezer-friendly for long-term storage.
Equipment You’ll Need
- ✓Large mixing bowl
- ✓Silicone spatula or wooden spoon
- ✓Small cookie scoop or tablespoon
- ✓Baking sheet or large plate
- ✓Parchment paper
- ✓Measuring cups and spoons
Ingredients
- ✓1 cup Old Fashioned Rolled Oats (certified gluten-free if necessary)
- ✓2/3 cup Creamy Natural Peanut Butter (stirred well)
- ✓1/2 cup Vanilla Protein Powder (whey or plant-based)
- ✓1/3 cup Honey or Maple Syrup
- ✓2 tablespoons Chia Seeds
- ✓1 teaspoon Vanilla Extract
- ✓1/4 teaspoon Sea Salt
- ✓1/3 cup Mini Dark Chocolate Chips (optional)
Instructions
- Prepare your workspace by lining a baking sheet or a large flat plate with parchment paper. This will prevent the balls from sticking while they set.
- In a large mixing bowl, combine the rolled oats, vanilla protein powder, chia seeds, and sea salt. Stir these dry ingredients together until they are evenly distributed.
- Add the creamy peanut butter, honey (or maple syrup), and vanilla extract to the bowl with the dry ingredients.
- Using a sturdy spatula or a wooden spoon, mix the ingredients vigorously. It may take a minute or two of mixing for the dry ingredients to fully incorporate with the wet ones. The mixture should be sticky and hold together when pressed.
- If using chocolate chips, fold them in now. Ensure the mixture is cool enough so the chips don’t melt.
- Cover the bowl and place it in the refrigerator for about 30 minutes. This chilling step is crucial as it allows the oats and chia seeds to absorb some moisture and makes the dough less sticky and easier to roll.
- Remove the bowl from the fridge. Using a small cookie scoop or a tablespoon, portion out the dough into approximately 16 even mounds.
- Roll each mound between the palms of your hands to form a smooth, tight ball. If the dough sticks to your hands, slightly dampening your palms with water can help.
- Place the rolled balls onto the prepared parchment-lined sheet.
- Enjoy immediately, or for a firmer texture, return the balls to the fridge for another 15-20 minutes before transferring them to a storage container.
Expert Cooking Tips
- ✓If your peanut butter is the dry, bottom-of-the-jar type, you may need to add an extra teaspoon of water or honey to get the mixture to bind.
- ✓Use ‘Old Fashioned’ rolled oats rather than quick oats for a better, chewier texture.
- ✓Wet your hands slightly before rolling the balls to prevent the mixture from sticking to your skin.
- ✓Let the mixture chill! Skipping the 30-minute refrigeration step will make the rolling process messy and difficult.
- ✓If you are allergic to peanuts, any nut or seed butter (like almond, cashew, or sunflower butter) works perfectly as a 1:1 substitute.
Substitutions and Variations
This recipe is incredibly versatile and can be adapted to suit various dietary needs and pantry staples. If you cannot eat peanuts, almond butter provides a milder, sweeter flavor, while cashew butter offers an ultra-creamy texture. For a nut-free school-safe version, sunflower seed butter or tahini are excellent alternatives, though tahini has a more savory note that may require a touch more sweetener. The sweetener itself can be swapped; while honey offers a distinct floral taste and great binding, maple syrup makes the recipe vegan and adds a rich, earthy sweetness. Agave nectar is another vegan option that is more neutral in flavor. Regarding the dry base, if you are out of protein powder, you can substitute it with an equal amount of extra oats (blitzed into flour) or almond flour, though this will change the protein count. Flax seeds or hemp hearts can easily replace chia seeds if you prefer, as they offer similar nutritional benefits, though hemp hearts won’t absorb moisture quite as effectively as chia. Finally, for the mix-ins, feel free to swap chocolate chips for dried cranberries, raisins, chopped nuts, or shredded coconut.
Common Mistakes to Avoid
The most common mistake when making protein balls is not adjusting for the consistency of the nut butter. Natural peanut butter can vary wildly in oil content; if yours is very runny, your dough might be too wet, and if it’s dry, the dough will crumble. Always start with the recommended amount and be prepared to add a sprinkle more oats if it’s too wet, or a splash of water/milk if it’s too dry. Another frequent error is using ‘steel-cut’ oats, which are too hard and will not soften sufficiently without cooking, making the balls unpleasant to chew. Over-mixing the dough once the chocolate chips are added can also lead to the heat of friction melting the chocolate, resulting in muddy-looking balls rather than ones with distinct chips. Lastly, impatience is a killer; skipping the chilling time usually results in a sticky mess that refuses to hold a spherical shape.
Serving Suggestions
These peanut butter protein balls are incredibly versatile in how they can be served. They are perfect as a pre-workout snack consumed 30 minutes before exercise for a quick energy release. They also serve as an excellent breakfast component for those on the go; pair two or three balls with a piece of fruit like a banana or an apple for a balanced morning meal. For a more indulgent treat, serve them alongside a cup of hot coffee or herbal tea in the afternoon. They can even be crumbled over yogurt bowls or oatmeal for added texture and flavor. If serving at a party or brunch, arrange them in a pyramid on a nice platter garnished with fresh berries to add a pop of color.
Storage and Reheating Tips
Proper storage is key to maintaining the texture and freshness of your protein balls. Store them in an airtight container in the refrigerator for up to one week. The cold environment keeps the oils in the peanut butter stable and maintains the firm texture. For longer storage, these balls freeze beautifully. Place them in a single layer on a baking sheet to freeze solid, then transfer them to a freezer-safe bag or container. They can be stored in the freezer for up to 3 months. When you’re ready to eat one, you can enjoy it straight from the freezer (they don’t freeze rock hard due to the fat content) or let it thaw at room temperature for 5-10 minutes.
Nutrition Facts (Estimated)
| Serving Size | 1 ball |
| Calories | 130 |
| Fat | 7g |
| Saturated Fat | 1.5g |
| Unsaturated Fat | 4g |
| Trans Fat | 0g |
| Cholesterol | 0mg |
| Sodium | 45mg |
| Carbohydrates | 12g |
| Fiber | 3g |
| Sugar | 6g |
| Protein | 6g |
Frequently Asked Questions
Can I make these without protein powder?
Yes, absolutely. You can replace the protein powder with an equal amount of almond flour, oat flour, or even dried powdered milk. Alternatively, you can add more rolled oats, but you may want to pulse them in a blender first to break them down slightly.
Are these gluten-free?
They are gluten-free provided you use certified gluten-free rolled oats. While oats are naturally gluten-free, they are often processed in facilities with wheat, so checking the label is essential for those with Celiac disease.
Why is my mixture too crumbly?
This usually happens if the peanut butter was too dry or the oats absorbed too much liquid. Try adding one teaspoon of water, milk, or extra honey at a time and mixing until the dough holds together when squeezed.
Can I use instant oats instead of rolled oats?
Yes, instant oats can be used. They are processed to be thinner and smaller, so the texture of the ball will be softer and less chewy. You might need slightly more instant oats to absorb the same amount of liquid.
Are chia seeds necessary?
While chia seeds provide great nutrients and help bind the mixture, they are not strictly necessary for the structure if you have other dry ingredients. You can omit them or swap them for flax seeds or hemp hearts.
Is this recipe vegan?
To make this recipe 100% vegan, ensure you use maple syrup or agave nectar instead of honey, and use a plant-based protein powder rather than whey or casein.
How many calories are in one ball?
Each ball contains approximately 100-130 calories, depending on the specific brand of peanut butter and protein powder used, as well as the size of your scoop.
Can I use crunchy peanut butter?
Definitely! Crunchy peanut butter adds a wonderful texture. Just be aware that crunchy peanut butter is sometimes drier than creamy, so you might need a touch more liquid sweetener.
Do these melt at room temperature?
They will soften if left out in a warm room for a long time because of the natural oils in the peanut butter and the chocolate chips, but they generally hold their shape well at standard room temperature.
Conclusion
In conclusion, these Peanut Butter Protein Balls with Chia Seeds are more than just a convenient snack; they are a lifestyle hack for anyone looking to maintain a healthy diet without sacrificing flavor or time. They prove that you don’t need complicated equipment or hours in the kitchen to nourish your body with high-quality ingredients. Whether you are meal-prepping for a busy week ahead, looking for a kid-friendly snack that isn’t loaded with processed sugar, or simply trying to up your protein intake, this recipe is a reliable, delicious solution. Give them a try, experiment with your favorite mix-ins, and enjoy the satisfying crunch and creamy sweetness of your new favorite homemade treat.