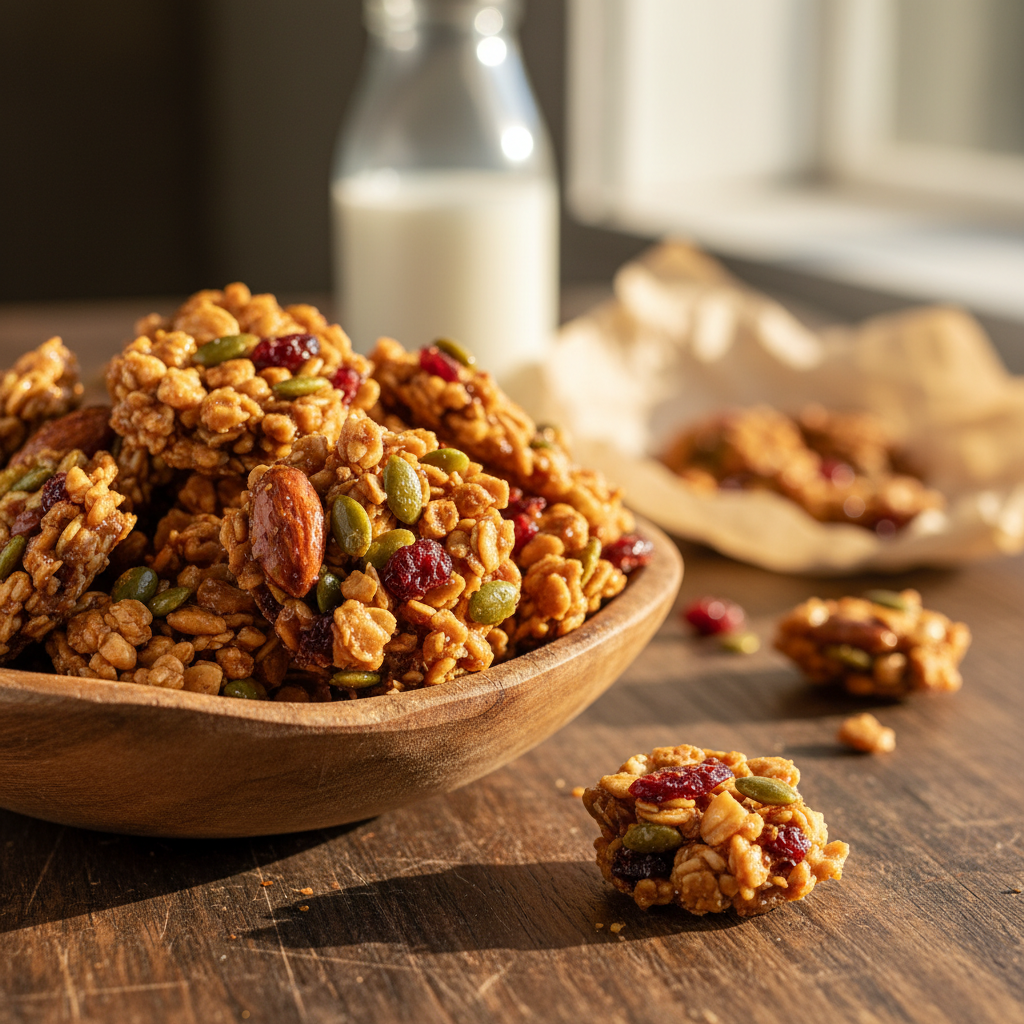
Crunchy Superfood Trail Mix Clusters: The Ultimate Seed & Nut Snack
Trail Mix Cluster With Seeds And Nuts Recipe
Ditch the store-bought bags filled with fillers and embrace these homemade Trail Mix Clusters. Packed with roasted almonds, pumpkin seeds, and a touch of maple syrup, these bite-sized powerhouses offer the perfect balance of salty, sweet, and crunchy for on-the-go energy.
10 minutes
25 minutes
35 minutes (plus cooling time)
4 cups
Snack
Baking
American
Gluten-Free
There is a distinct moment in the mid-afternoon when energy levels dip, and the craving for something substantial hits. It is the time when you don’t just want a snack; you want a texture, a flavor, and a boost that sustains you. Enter the Trail Mix Cluster—a brilliant evolution of loose trail mix and chunky granola. While traditional trail mix (often affectionately known as GORP) has been a staple for hikers and outdoor enthusiasts for decades, it often suffers from the “picking” problem, where you fish out the chocolate and cashews, leaving behind a sad bag of raisins. These clusters solve that problem entirely by binding the best ingredients together into a cohesive, shatteringly crisp bite.
What makes this recipe truly stand out is its versatility and its texture profile. Unlike soft energy balls or loose nuts, these clusters are baked until they achieve a golden, caramelized snap. We use a blend of nutrient-dense seeds like pepitas (pumpkin seeds) and sunflower seeds, paired with hearty nuts like almonds and walnuts. The binding agent—a simple, wholesome mixture of pure maple syrup and coconut oil—doesn’t just hold the clusters together; it enrobes every crevice in a glossy, sweet glaze that enhances the natural earthiness of the nuts.
Furthermore, making this at home allows you to control the sugar and sodium content, avoiding the hidden preservatives found in commercial varieties. Whether you are packing them for a strenuous hike, crumbling them over your morning Greek yogurt, or simply keeping a jar on your desk for emergency snacking, these clusters are a game-changer. They bridge the gap between a dessert and a health food, offering satisfying healthy fats and plant-based protein without compromising on the indulgence of a sweet-and-salty treat.
History & Origins
The concept of trail mix is as old as the necessity for portable, high-energy food. Long before it was packaged in plastic bags for supermarkets, indigenous peoples of North America created ‘pemmican,’ a concentrated mixture of fat and protein used for long journeys. However, the modern iteration of trail mix—specifically the combination of nuts, raisins, and chocolate—is often traced back to the early 20th century. Literary references from the 1910s, specifically by outdoorsman Horace Kephart in his camping guides, recommend mixtures of nuts and dried fruits for sustained energy while trekking.
The term ‘GORP’ (Good Old Raisins and Peanuts) became popularized in the 1950s and 60s within the Boy Scouts and hiking communities. It was a utilitarian fuel: inexpensive, shelf-stable, and calorie-dense. Simultaneously, the health food movement of the 1960s saw a resurgence of granola, a baked grain and nut mixture that had roots in the late 19th-century sanatoriums. The ‘cluster’ concept is essentially the marriage of these two histories. As granola became a commercial breakfast staple, consumers consistently favored the large, stuck-together chunks over the loose oats.
In recent decades, as the popularity of grain-free, Paleo, and Keto diets has surged, the ‘granola’ aspect has often been stripped away, leaving just the nuts and seeds. This gave birth to the modern Trail Mix Cluster—a snack that retains the roasted, clustered appeal of granola but focuses on the high-fat, high-protein profile of traditional trail mix. It represents a culinary shift from simple sustenance to gourmet snacking, where texture and premium ingredients take center stage over bulk fillers.
Why This Recipe Works
This recipe succeeds where many others fail due to the precise balance of binding agents and the baking technique. The primary challenge with nut and seed clusters is getting them to actually stick together without becoming a sticky, taffy-like mess or burning before they set.
First, the ratio of liquid sweetener (maple syrup) to fat (coconut oil) is critical. The sugar in the maple syrup caramelizes in the oven, acting as the ‘cement’ that hardens as it cools. If you use too much oil, the mixture will be greasy and crumble; too much syrup, and it becomes rock-hard candy. This recipe hits the sweet spot (pun intended) where the result is crisp but biteable.
Secondly, the inclusion of an egg white (optional but recommended in the tips) or the specific use of chia/flax seeds creates a natural binding matrix. The proteins in the egg white or the mucilage in the seeds help fuse the larger nuts to the smaller seeds.
Finally, the ‘press and wait’ method is the secret to success. By pressing the mixture firmly into the baking sheet before cooking, you create a single solid slab. Baking it low and slow ensures the moisture evaporates evenly from the center without scorching the edges. The most important step—letting it cool completely on the pan—allows the sugars to recrystallize, ensuring that when you break it apart, you get substantial, jagged shards rather than loose dust.
Why You’ll Love This Recipe
- ✓High in plant-based protein and healthy fats.
- ✓Naturally gluten-free and easily adaptable for vegan diets.
- ✓Stays crunchy for weeks when stored properly.
- ✓Customizable with your favorite nuts, seeds, and spices.
- ✓Cheaper and healthier than store-bought gourmet nut mixes.
- ✓Perfect for meal prep, hiking trips, or yogurt toppings.
Equipment You’ll Need
- ✓Large mixing bowl
- ✓Small microwave-safe bowl or saucepan
- ✓Rimmed baking sheet
- ✓Parchment paper
- ✓Silicone spatula
- ✓Measuring cups and spoons
Ingredients
- ✓1 cup raw almonds, roughly chopped
- ✓1 cup raw cashews or walnuts, roughly chopped
- ✓1/2 cup raw pumpkin seeds (pepitas)
- ✓1/2 cup raw sunflower seeds
- ✓1/4 cup chia seeds or flax seeds
- ✓1/3 cup pure maple syrup
- ✓2 tablespoons coconut oil, melted
- ✓1 teaspoon vanilla extract
- ✓1/2 teaspoon ground cinnamon
- ✓1/4 teaspoon sea salt
- ✓1/2 cup dried cranberries or cherries (add after baking)
Instructions
- Preheat your oven to 325°F (163°C). Line a large rimmed baking sheet with parchment paper.
- In a large mixing bowl, combine the chopped almonds, cashews, pumpkin seeds, sunflower seeds, and chia seeds. Stir well to distribute the different sizes evenly.
- In a separate small bowl, whisk together the maple syrup, melted coconut oil, vanilla extract, cinnamon, and sea salt until the mixture is emulsified.
- Pour the liquid mixture over the dry nut and seed mixture. Use a silicone spatula to toss and fold until every nut and seed is thoroughly coated in the glaze.
- Transfer the mixture to the prepared baking sheet. Using the back of your spatula, press the mixture down firmly into a compact, even layer. This packing step is crucial for forming clusters.
- Bake for 20-25 minutes, rotating the pan halfway through. The edges should be golden brown, and the mixture should look toasted. Watch closely near the end to prevent burning.
- Remove from the oven. DO NOT STIR. If you want to add dried fruit, gently press the cranberries into the top of the hot mixture now.
- Place the baking sheet on a wire rack and let it cool completely—for at least 45 minutes to an hour. The mixture will harden as it cools.
- Once fully cooled and crisp, use your hands to break the slab into desired cluster sizes. Store in an airtight container.
Expert Cooking Tips
- ✓Don’t skip the press: The more firmly you pack the mixture onto the tray before baking, the better the clusters will hold together.
- ✓Cool completely: It is tempting to eat it warm, but the clusters only solidify once the sugars have cooled and recrystallized.
- ✓Chop the big nuts: Whole almonds can make the clusters fall apart. Roughly chopping them increases the surface area for the binder to stick to.
- ✓Watch the oven: Nuts burn quickly. If your oven runs hot, check at the 18-minute mark.
- ✓Add fruit last: Dried fruit can become hard and bitter if baked for the full duration. Adding it right after baking keeps it chewy.
- ✓Use fresh spices: Since cinnamon is a primary flavor note, ensure your spices aren’t stale for the best aroma.
Substitutions and Variations
This recipe is incredibly forgiving and serves as a blank canvas for your pantry. If you don’t have almonds or cashews, feel free to swap them for pecans, macadamia nuts, or hazelnuts. For a nut-free version (school safe), replace the nuts entirely with more seeds like hemp hearts, sesame seeds, and extra pumpkin seeds, or add rolled oats for a granola hybrid. The sweetener can be swapped for honey or agave nectar, though honey will result in a slightly softer, stickier cluster and browns faster, so keep an eye on the oven. If you dislike coconut oil, melted butter or a neutral oil like avocado oil works well, though butter adds a richer, non-vegan flavor profile. For the dried fruit, chopped apricots, raisins, or even freeze-dried strawberries make excellent alternatives to cranberries.
Common Mistakes to Avoid
The most common mistake is stirring the mixture immediately after taking it out of the oven. Doing this breaks the delicate sugar bonds before they have set, resulting in loose granola rather than clusters. Another error is baking at too high a temperature; 350°F or higher often burns the seeds before the center of the cluster has dried out, leading to a bitter taste. Additionally, using roasted and salted nuts instead of raw ones can lead to an overly salty final product; if you only have salted nuts, omit the added sea salt in the recipe. Finally, failing to press the mixture firmly into the pan results in a lack of structural integrity for the clusters.
Serving Suggestions
These clusters are fantastic on their own as a hiking snack or mid-day pick-me-up. However, they truly shine as a topping. Sprinkle them over vanilla bean Greek yogurt or an acai bowl for texture. They add a wonderful crunch to oatmeal or overnight oats. For a dessert twist, serve a handful over a scoop of dairy-free coconut ice cream. You can also serve them on a charcuterie board alongside sharp cheddar cheese and apple slices; the sweet and salty profile pairs beautifully with savory elements.
Storage and Reheating Tips
To maintain maximum crunch, store the completely cooled clusters in an airtight glass jar or plastic container at room temperature. They will stay fresh for up to 2 weeks. Avoid storing them in the refrigerator, as the humidity can introduce moisture and make the seeds chewy or soft. If you live in a particularly humid climate, you can add a silica gel packet to the jar to absorb excess moisture. For long-term storage, you can freeze the clusters in a freezer-safe bag for up to 3 months; just let them come to room temperature before eating.
Nutrition Facts (Estimated)
| Serving Size | 1/4 cup |
| Calories | 180 |
| Fat | 14g |
| Saturated Fat | 3g |
| Unsaturated Fat | 10g |
| Trans Fat | 0g |
| Cholesterol | 0mg |
| Sodium | 85mg |
| Carbohydrates | 10g |
| Fiber | 3g |
| Sugar | 6g |
| Protein | 5g |
Frequently Asked Questions
Can I use honey instead of maple syrup?
Yes, honey works as a binder, but it browns faster than maple syrup. Reduce the oven temperature by 15 degrees and watch closely to prevent burning. The result may be slightly stickier.
Why did my clusters fall apart?
This usually happens for two reasons: either you didn’t press the mixture down firmly enough before baking, or you didn’t let it cool completely before breaking it up. Patience during cooling is key.
Is this recipe keto-friendly?
As written, it uses maple syrup which has sugar. To make it Keto, substitute the maple syrup with a sugar-free sticky sweetener like a monk fruit/allulose syrup blend that caramelizes.
Can I add chocolate chips?
Absolutely! Wait until the clusters are completely cooled before mixing in chocolate chips, otherwise, they will melt and create a messy (though delicious) chocolate coating.
Do I need to soak the nuts first?
No soaking is required for this recipe. We want the nuts to be dry so they roast and become crunchy. Soaking would add moisture that would extend the baking time significantly.
Can I make this oil-free?
The oil helps conduct heat and create the crisp texture. You can try using nut butter (like almond butter) in place of the oil, but the texture will be softer and less ‘glassy’ in its crunch.
How do I make the clusters bigger?
For mega-clusters, add one egg white whisked until frothy to the liquid mixture. The protein acts as a super-glue. Also, avoid breaking the slab too aggressively after cooling.
Are these safe for school lunches?
Most schools are nut-free. To make this school-safe, replace all nuts with a mix of sunflower seeds, pumpkin seeds, and rolled oats.
Conclusion
Making your own Trail Mix Clusters is a small effort that yields a massive reward in flavor and nutrition. By controlling the ingredients, you avoid the excess sugar and preservatives of store-bought brands while creating a snack that is perfectly tailored to your taste buds. Whether you are fueling a mountain climb or just powering through a Tuesday afternoon slump, these golden, crunchy nuggets of joy are sure to become a staple in your kitchen. Bake a double batch, because they tend to disappear surprisingly fast!